

I'm going to replace my crossover gaskets in a couple of days along with my right cam cover. I'm pretty sure I have everything I'll need in the way of parts and special tools but would like some feedback on a couple of procedural items.
1. I purchased a new seal kit for the fuel rail/injectors. There are both blue and black 'O' rings for the injectors that, with the naked eye, look pretty darned similar in size (in fact identical without actually using a caliper). Will the original 'O' rings also be colour coded? If not, how will I know which goes on the top of the injector versus the bottom?
2. What is best used to lubricate the new 'O' rings? I've heard some people say to just dip the end of the injector in gasoline immediately prior to reassembly, others say to apply a very light film of lithium grease. What is accepted industry practice?
The last time I really got much into mechanical repairs (other than brakes or the odd cooler line) I was working on a vehicle with a carburetor. I've never removed/installed a fuel rail or injectors so I'm a little shy of experience with this. Sadly, this kind of dates me a little...
Working on my LD8...
-
ddalder
- Resident Gearhead

- Posts: 2599
- Joined: Wed Apr 01, 2009 7:11 pm
- Year and Trim: 2004 GXP, 2008 STS, 2020 XT6
- Location: Alberta, Canada
Working on my LD8...

Bose Luxury Sound System w/Touch Screen Navigation, Addition of Factory XM, 2005 MY Antenna, OnStar Upgrade (3G),
RainSense Wipers, Backup Camera, '00 Style Door Panel Courtesy Lights, Heated Washer Solvent, 2X Remote Trunk Release,
Turn Signal Mirrors, Center Console Courtesy Lamp, Rear Outboard Heated Seats, PVD Chrome 18" Factory Rims, Upgraded
Carbon Fibre Appearance Interior Trim, Highly Modified Main Body Harness, Instrument Panel, Door, Door Panel & Headliner
Wiring Harnesses, Custom Fuse Box & Tire and Loading Information Decals, Additional Acoustic Insulation[/size][/color]
-
CMNTMXR57

- Certified Bonneville Nut

- Posts: 5841
- Joined: Wed May 13, 2009 10:45 pm
- Year and Trim: 2006 STS-V, 2004 GTO, 2009 G8 GT
- Location: CHICAGO
Re: Working on my LD8...
1) Most are black. Don't know that there is a difference size or quality wise.
2) I've used any grease readily available. You're not bathing it in grease. Just enough to coat it to allow it to slide into place. Lithium will be fine, heck vaseline would be fine. Don't know that there is any industry practice. It's just putting round peg into round hole.
2) I've used any grease readily available. You're not bathing it in grease. Just enough to coat it to allow it to slide into place. Lithium will be fine, heck vaseline would be fine. Don't know that there is any industry practice. It's just putting round peg into round hole.

Retired Bonneville Owner and former GM Tech:
2004 Pontiac Bonneville GXP: Black/Ebony *SOLD*
Summer Toys: Combined 827 RWHP / 877lb/ft RWTQ
2004 Pontiac GTO: Impulse Blue Metallic/Black/M6: lots 'o mods, 415 RWHP / 405lb/ft RWTQ!
2006 Cadillac STS-V: Light Platinum Metallic/Light Gray/A6 - Spectre CAI, Magnaflow exhaust, Speed Inc. tune, 412 RWHP / 472lb/ft RWTQ
Daily Drivers:
2019 Chrysler Pacifica Limited: Mommy's new RGC
2015 Chrysler Town & Country Limited Platinum: Kids new RGC
2011 Camaro SS
2009 Pontiac G8 GT: L76, Sport Red Metallic
2004 GMC Sierra 2500HD: Victory Red - 8.1L Big Block and Allison
2003 Chevrolet Suburban 2500: Doeskin Tan - 8.1L Big Block... RIP
1999 Chevrolet Suburban: Sunset Gold Metallic - RIP
-
ddalder
- Resident Gearhead
- Posts: 2599
- Joined: Wed Apr 01, 2009 7:11 pm
- Year and Trim: 2004 GXP, 2008 STS, 2020 XT6
- Location: Alberta, Canada
Re: Working on my LD8...
Thanks for the quick response.
I know that some petroleum based products will degrade certain types of rubber so I wanted to make sure I avoid any potential problems. As for the 'O' rings (and all the other parts), I purchased everything from GM. Since the 'O' rings came as a service kit I figured that they would only spend the money on different colours if it meant something but it doesn't really look like there's a difference.
I know that some petroleum based products will degrade certain types of rubber so I wanted to make sure I avoid any potential problems. As for the 'O' rings (and all the other parts), I purchased everything from GM. Since the 'O' rings came as a service kit I figured that they would only spend the money on different colours if it meant something but it doesn't really look like there's a difference.
Bose Luxury Sound System w/Touch Screen Navigation, Addition of Factory XM, 2005 MY Antenna, OnStar Upgrade (3G),
RainSense Wipers, Backup Camera, '00 Style Door Panel Courtesy Lights, Heated Washer Solvent, 2X Remote Trunk Release,
Turn Signal Mirrors, Center Console Courtesy Lamp, Rear Outboard Heated Seats, PVD Chrome 18" Factory Rims, Upgraded
Carbon Fibre Appearance Interior Trim, Highly Modified Main Body Harness, Instrument Panel, Door, Door Panel & Headliner
Wiring Harnesses, Custom Fuse Box & Tire and Loading Information Decals, Additional Acoustic Insulation[/size][/color]
-
CMNTMXR57
- Certified Bonneville Nut
- Posts: 5841
- Joined: Wed May 13, 2009 10:45 pm
- Year and Trim: 2006 STS-V, 2004 GTO, 2009 G8 GT
- Location: CHICAGO
Re: Working on my LD8...
It's rubber. No different than other rubber other than composition of that rubber. Can't live in fear about what may 'degrade" anything. I'd be more worried about usage and heat causing rubber degredation than what slight bit of lube you put on them to facilitate ease of re-installation and seating.
TYPICALLY, if you have two colored o-rings, the blue goes on the top, and black on the bottom of the injector. They're the same size, just made of different rubber materials. I know from years of doing it, GM says to use engine oil (clean), on them to lubricate them. Engine oil is petroleum based...
TYPICALLY, if you have two colored o-rings, the blue goes on the top, and black on the bottom of the injector. They're the same size, just made of different rubber materials. I know from years of doing it, GM says to use engine oil (clean), on them to lubricate them. Engine oil is petroleum based...
Retired Bonneville Owner and former GM Tech:
2004 Pontiac Bonneville GXP: Black/Ebony *SOLD*
Summer Toys: Combined 827 RWHP / 877lb/ft RWTQ
2004 Pontiac GTO: Impulse Blue Metallic/Black/M6: lots 'o mods, 415 RWHP / 405lb/ft RWTQ!
2006 Cadillac STS-V: Light Platinum Metallic/Light Gray/A6 - Spectre CAI, Magnaflow exhaust, Speed Inc. tune, 412 RWHP / 472lb/ft RWTQ
Daily Drivers:
2019 Chrysler Pacifica Limited: Mommy's new RGC
2015 Chrysler Town & Country Limited Platinum: Kids new RGC
2011 Camaro SS
2009 Pontiac G8 GT: L76, Sport Red Metallic
2004 GMC Sierra 2500HD: Victory Red - 8.1L Big Block and Allison
2003 Chevrolet Suburban 2500: Doeskin Tan - 8.1L Big Block... RIP
1999 Chevrolet Suburban: Sunset Gold Metallic - RIP
-
ddalder
- Resident Gearhead
- Posts: 2599
- Joined: Wed Apr 01, 2009 7:11 pm
- Year and Trim: 2004 GXP, 2008 STS, 2020 XT6
- Location: Alberta, Canada
Re: Working on my LD8...
Yes, well I've been accused (completely unjustifiably I might add) for following process far too closely lol. Ask me why I have a few hundred rolls of wire harness tape in my garage...
Bose Luxury Sound System w/Touch Screen Navigation, Addition of Factory XM, 2005 MY Antenna, OnStar Upgrade (3G),
RainSense Wipers, Backup Camera, '00 Style Door Panel Courtesy Lights, Heated Washer Solvent, 2X Remote Trunk Release,
Turn Signal Mirrors, Center Console Courtesy Lamp, Rear Outboard Heated Seats, PVD Chrome 18" Factory Rims, Upgraded
Carbon Fibre Appearance Interior Trim, Highly Modified Main Body Harness, Instrument Panel, Door, Door Panel & Headliner
Wiring Harnesses, Custom Fuse Box & Tire and Loading Information Decals, Additional Acoustic Insulation[/size][/color]
-
CMNTMXR57
- Certified Bonneville Nut
- Posts: 5841
- Joined: Wed May 13, 2009 10:45 pm
- Year and Trim: 2006 STS-V, 2004 GTO, 2009 G8 GT
- Location: CHICAGO
Re: Working on my LD8...
Nothing wrong with being anal retentive. I lead that parade. But it's rubber, in an engine. A little lube isn't going to hurt it.
Retired Bonneville Owner and former GM Tech:
2004 Pontiac Bonneville GXP: Black/Ebony *SOLD*
Summer Toys: Combined 827 RWHP / 877lb/ft RWTQ
2004 Pontiac GTO: Impulse Blue Metallic/Black/M6: lots 'o mods, 415 RWHP / 405lb/ft RWTQ!
2006 Cadillac STS-V: Light Platinum Metallic/Light Gray/A6 - Spectre CAI, Magnaflow exhaust, Speed Inc. tune, 412 RWHP / 472lb/ft RWTQ
Daily Drivers:
2019 Chrysler Pacifica Limited: Mommy's new RGC
2015 Chrysler Town & Country Limited Platinum: Kids new RGC
2011 Camaro SS
2009 Pontiac G8 GT: L76, Sport Red Metallic
2004 GMC Sierra 2500HD: Victory Red - 8.1L Big Block and Allison
2003 Chevrolet Suburban 2500: Doeskin Tan - 8.1L Big Block... RIP
1999 Chevrolet Suburban: Sunset Gold Metallic - RIP
-
ddalder
- Resident Gearhead
- Posts: 2599
- Joined: Wed Apr 01, 2009 7:11 pm
- Year and Trim: 2004 GXP, 2008 STS, 2020 XT6
- Location: Alberta, Canada
Re: Working on my LD8...
Soooo... what's your theory on why the cam covers leak? I have a few ideas but am interested in what others think as well...
Bose Luxury Sound System w/Touch Screen Navigation, Addition of Factory XM, 2005 MY Antenna, OnStar Upgrade (3G),
RainSense Wipers, Backup Camera, '00 Style Door Panel Courtesy Lights, Heated Washer Solvent, 2X Remote Trunk Release,
Turn Signal Mirrors, Center Console Courtesy Lamp, Rear Outboard Heated Seats, PVD Chrome 18" Factory Rims, Upgraded
Carbon Fibre Appearance Interior Trim, Highly Modified Main Body Harness, Instrument Panel, Door, Door Panel & Headliner
Wiring Harnesses, Custom Fuse Box & Tire and Loading Information Decals, Additional Acoustic Insulation[/size][/color]
-
CMNTMXR57
- Certified Bonneville Nut
- Posts: 5841
- Joined: Wed May 13, 2009 10:45 pm
- Year and Trim: 2006 STS-V, 2004 GTO, 2009 G8 GT
- Location: CHICAGO
Re: Working on my LD8...
I've posted it numerous times. 7.5lb/ft or 89 in/lb torque spec and heat cycling of the engine just works them loose over time. The gasket can be bad too.
First thing I would do, re-torque them to the 89 in/lb. See if that stops it from leaking. If it doesn't, pull the bolts, loctite them, and go to ~10 lb/ft (120 in/lb) or so. If they still leak after that, then replace gaskets too. If you do this, it is a PITA, especially the right side (back side) of the engine due to space constraints and the main harness lack of slack to work around. The left side (front side), you have to remove the water pump pulley, which I would also recommend replacing the cam cover seal for that too. This is why I put gasket replacement as last resort.
First thing I would do, re-torque them to the 89 in/lb. See if that stops it from leaking. If it doesn't, pull the bolts, loctite them, and go to ~10 lb/ft (120 in/lb) or so. If they still leak after that, then replace gaskets too. If you do this, it is a PITA, especially the right side (back side) of the engine due to space constraints and the main harness lack of slack to work around. The left side (front side), you have to remove the water pump pulley, which I would also recommend replacing the cam cover seal for that too. This is why I put gasket replacement as last resort.
Retired Bonneville Owner and former GM Tech:
2004 Pontiac Bonneville GXP: Black/Ebony *SOLD*
Summer Toys: Combined 827 RWHP / 877lb/ft RWTQ
2004 Pontiac GTO: Impulse Blue Metallic/Black/M6: lots 'o mods, 415 RWHP / 405lb/ft RWTQ!
2006 Cadillac STS-V: Light Platinum Metallic/Light Gray/A6 - Spectre CAI, Magnaflow exhaust, Speed Inc. tune, 412 RWHP / 472lb/ft RWTQ
Daily Drivers:
2019 Chrysler Pacifica Limited: Mommy's new RGC
2015 Chrysler Town & Country Limited Platinum: Kids new RGC
2011 Camaro SS
2009 Pontiac G8 GT: L76, Sport Red Metallic
2004 GMC Sierra 2500HD: Victory Red - 8.1L Big Block and Allison
2003 Chevrolet Suburban 2500: Doeskin Tan - 8.1L Big Block... RIP
1999 Chevrolet Suburban: Sunset Gold Metallic - RIP
-
ddalder
- Resident Gearhead
- Posts: 2599
- Joined: Wed Apr 01, 2009 7:11 pm
- Year and Trim: 2004 GXP, 2008 STS, 2020 XT6
- Location: Alberta, Canada
Re: Working on my LD8...
I had considered torque and heating/cooling as being a problem as well, similar to the bolts loosening off on the intake plenum. But then I considered that the bolt GM uses may also be some of the problem. I plan to use Loctite and prior to disassembly I will be checking to see if any of the bolts are below torque spec. The gasket has been replaced at least twice while under warranty. I'm wondering if the non-threaded portion of the bolt is too thick and when it contacts the head (or if it does contact the head at all), regardless of torque, prohibits enough pressure being applied to the gasket. For those that might read this but have never had one apart, I've included pictures of the bolt.


Bose Luxury Sound System w/Touch Screen Navigation, Addition of Factory XM, 2005 MY Antenna, OnStar Upgrade (3G),
RainSense Wipers, Backup Camera, '00 Style Door Panel Courtesy Lights, Heated Washer Solvent, 2X Remote Trunk Release,
Turn Signal Mirrors, Center Console Courtesy Lamp, Rear Outboard Heated Seats, PVD Chrome 18" Factory Rims, Upgraded
Carbon Fibre Appearance Interior Trim, Highly Modified Main Body Harness, Instrument Panel, Door, Door Panel & Headliner
Wiring Harnesses, Custom Fuse Box & Tire and Loading Information Decals, Additional Acoustic Insulation[/size][/color]
-
CMNTMXR57
- Certified Bonneville Nut
- Posts: 5841
- Joined: Wed May 13, 2009 10:45 pm
- Year and Trim: 2006 STS-V, 2004 GTO, 2009 G8 GT
- Location: CHICAGO
Re: Working on my LD8...
That be it.
It affects them all. Even my handbuilt LC3. I torqued them last spring, and when I drove it for the first time this past Thursday (after it sat for 5 months), I could smell oil burning. Sure as poop, when I got it on the lift yesterday, looked, it was oil dripping down the heads...
It affects them all. Even my handbuilt LC3. I torqued them last spring, and when I drove it for the first time this past Thursday (after it sat for 5 months), I could smell oil burning. Sure as poop, when I got it on the lift yesterday, looked, it was oil dripping down the heads...
Retired Bonneville Owner and former GM Tech:
2004 Pontiac Bonneville GXP: Black/Ebony *SOLD*
Summer Toys: Combined 827 RWHP / 877lb/ft RWTQ
2004 Pontiac GTO: Impulse Blue Metallic/Black/M6: lots 'o mods, 415 RWHP / 405lb/ft RWTQ!
2006 Cadillac STS-V: Light Platinum Metallic/Light Gray/A6 - Spectre CAI, Magnaflow exhaust, Speed Inc. tune, 412 RWHP / 472lb/ft RWTQ
Daily Drivers:
2019 Chrysler Pacifica Limited: Mommy's new RGC
2015 Chrysler Town & Country Limited Platinum: Kids new RGC
2011 Camaro SS
2009 Pontiac G8 GT: L76, Sport Red Metallic
2004 GMC Sierra 2500HD: Victory Red - 8.1L Big Block and Allison
2003 Chevrolet Suburban 2500: Doeskin Tan - 8.1L Big Block... RIP
1999 Chevrolet Suburban: Sunset Gold Metallic - RIP
-
ddalder
- Resident Gearhead
- Posts: 2599
- Joined: Wed Apr 01, 2009 7:11 pm
- Year and Trim: 2004 GXP, 2008 STS, 2020 XT6
- Location: Alberta, Canada
Re: Working on my LD8...
The rubber grommets that the bolts pass through seem quite snug. Of course age and heat can affect this. The other consideration was that a technician may have significantly over-torqued them during one or both of the gasket replacements warping the cover. It's a pretty solid cast cover though, unlike the tin covers used on older cars.
What seems a little odd though is that it's only the right side (and only at the corner by the coolant reservoir). Never had a problem with the left leaking...
What seems a little odd though is that it's only the right side (and only at the corner by the coolant reservoir). Never had a problem with the left leaking...
Last edited by ddalder on Mon Mar 23, 2015 12:25 am, edited 1 time in total.
Bose Luxury Sound System w/Touch Screen Navigation, Addition of Factory XM, 2005 MY Antenna, OnStar Upgrade (3G),
RainSense Wipers, Backup Camera, '00 Style Door Panel Courtesy Lights, Heated Washer Solvent, 2X Remote Trunk Release,
Turn Signal Mirrors, Center Console Courtesy Lamp, Rear Outboard Heated Seats, PVD Chrome 18" Factory Rims, Upgraded
Carbon Fibre Appearance Interior Trim, Highly Modified Main Body Harness, Instrument Panel, Door, Door Panel & Headliner
Wiring Harnesses, Custom Fuse Box & Tire and Loading Information Decals, Additional Acoustic Insulation[/size][/color]
-
1oldman
- Certified Bonneville Nut
- Posts: 3975
- Joined: Tue May 04, 2010 11:21 pm
- Year and Trim: 2017 Hyundai Santa Fe Sport
- Location: Lone Star State
Re: Working on my LD8...
Lane, just curious. Would cleaning the valve cover bolts with brake parts cleaner (aerosol and a tooth brush), then applying a very small amount of the green thread lock on the bolts, and let it dry, and clean the valve cover bolt holes with brake parts cleaner, let it dry, be a bad idea? - BC
In Memory of Brad - 1/21/1977 .. 10/23/2013 ...... Aaron - 1977 .. 2017 .....
2017 Hyundai Santa Fe Sport ..... 1992 Bonneville SSE 1SB 170 HP L27 4T60E retired/sold to MattStrike ..... 2005 Bonneville SE 1SC 205 HP L36 4T65E - retired/salvage yard ..... PBCF user 2321
2017 Hyundai Santa Fe Sport ..... 1992 Bonneville SSE 1SB 170 HP L27 4T60E retired/sold to MattStrike ..... 2005 Bonneville SE 1SC 205 HP L36 4T65E - retired/salvage yard ..... PBCF user 2321
-
ddalder
- Resident Gearhead
- Posts: 2599
- Joined: Wed Apr 01, 2009 7:11 pm
- Year and Trim: 2004 GXP, 2008 STS, 2020 XT6
- Location: Alberta, Canada
Re: Working on my LD8...
One point mentioned in the Loctite documentation is that cleaners such as this can still leave a residue that will affect the thread locking compound. They make a product to pre-treat in cases like this (and depending on the types of metals involved). Alternatively, which is what I'm going to use, is Loctite 243 which is not affected by small amounts of contamination. You can see there is already a compound on the threads of the new bolt in my picture applied by GM's supplier.
Bose Luxury Sound System w/Touch Screen Navigation, Addition of Factory XM, 2005 MY Antenna, OnStar Upgrade (3G),
RainSense Wipers, Backup Camera, '00 Style Door Panel Courtesy Lights, Heated Washer Solvent, 2X Remote Trunk Release,
Turn Signal Mirrors, Center Console Courtesy Lamp, Rear Outboard Heated Seats, PVD Chrome 18" Factory Rims, Upgraded
Carbon Fibre Appearance Interior Trim, Highly Modified Main Body Harness, Instrument Panel, Door, Door Panel & Headliner
Wiring Harnesses, Custom Fuse Box & Tire and Loading Information Decals, Additional Acoustic Insulation[/size][/color]
-
CMNTMXR57
- Certified Bonneville Nut
- Posts: 5841
- Joined: Wed May 13, 2009 10:45 pm
- Year and Trim: 2006 STS-V, 2004 GTO, 2009 G8 GT
- Location: CHICAGO
Re: Working on my LD8...
You shouldn't need any cleaner on them. I have, but only on those gunked up with oil and what not.
The gasket itself has a rigid wire perimeter frame in the exact shape of the head laminated/molded into the rubber and meant to be fitted into the cam cover. You will also note in the pictures above, it has a triangular little tab near the bolt. There are a couple of these on the gasket. The helps hold it into place in the cam cover during positioning while installing.
It's not just a flimsy piece of rubber that could easily be subject to distortion unless it was massively overtorqued. The difference between 89 in/lb and 120 in/lb won't cause that. It's a fairly rigid piece.
Retired Bonneville Owner and former GM Tech:
2004 Pontiac Bonneville GXP: Black/Ebony *SOLD*
Summer Toys: Combined 827 RWHP / 877lb/ft RWTQ
2004 Pontiac GTO: Impulse Blue Metallic/Black/M6: lots 'o mods, 415 RWHP / 405lb/ft RWTQ!
2006 Cadillac STS-V: Light Platinum Metallic/Light Gray/A6 - Spectre CAI, Magnaflow exhaust, Speed Inc. tune, 412 RWHP / 472lb/ft RWTQ
Daily Drivers:
2019 Chrysler Pacifica Limited: Mommy's new RGC
2015 Chrysler Town & Country Limited Platinum: Kids new RGC
2011 Camaro SS
2009 Pontiac G8 GT: L76, Sport Red Metallic
2004 GMC Sierra 2500HD: Victory Red - 8.1L Big Block and Allison
2003 Chevrolet Suburban 2500: Doeskin Tan - 8.1L Big Block... RIP
1999 Chevrolet Suburban: Sunset Gold Metallic - RIP
-
ddalder
- Resident Gearhead
- Posts: 2599
- Joined: Wed Apr 01, 2009 7:11 pm
- Year and Trim: 2004 GXP, 2008 STS, 2020 XT6
- Location: Alberta, Canada
Re: Working on my LD8...
The warped cam cover was a thought by the shop foreman at one of the dealerships that did a gasket replacement. It will be interesting to see once I get into it a little further. All I know for sure is that it's been driving me absolutely crazy. To have what has been an uncorrectable leak at less than 120,000km is unacceptable (at least in my mind).
Bose Luxury Sound System w/Touch Screen Navigation, Addition of Factory XM, 2005 MY Antenna, OnStar Upgrade (3G),
RainSense Wipers, Backup Camera, '00 Style Door Panel Courtesy Lights, Heated Washer Solvent, 2X Remote Trunk Release,
Turn Signal Mirrors, Center Console Courtesy Lamp, Rear Outboard Heated Seats, PVD Chrome 18" Factory Rims, Upgraded
Carbon Fibre Appearance Interior Trim, Highly Modified Main Body Harness, Instrument Panel, Door, Door Panel & Headliner
Wiring Harnesses, Custom Fuse Box & Tire and Loading Information Decals, Additional Acoustic Insulation[/size][/color]
-
CMNTMXR57
- Certified Bonneville Nut
- Posts: 5841
- Joined: Wed May 13, 2009 10:45 pm
- Year and Trim: 2006 STS-V, 2004 GTO, 2009 G8 GT
- Location: CHICAGO
Re: Working on my LD8...
It is the N*'s lot in life. Sorta like Big Block Chevy V8's. It's just one of the annoying things they do.
That cover is aluminum, so yea, potentially it could've been warped or damaged...
That cover is aluminum, so yea, potentially it could've been warped or damaged...
Retired Bonneville Owner and former GM Tech:
2004 Pontiac Bonneville GXP: Black/Ebony *SOLD*
Summer Toys: Combined 827 RWHP / 877lb/ft RWTQ
2004 Pontiac GTO: Impulse Blue Metallic/Black/M6: lots 'o mods, 415 RWHP / 405lb/ft RWTQ!
2006 Cadillac STS-V: Light Platinum Metallic/Light Gray/A6 - Spectre CAI, Magnaflow exhaust, Speed Inc. tune, 412 RWHP / 472lb/ft RWTQ
Daily Drivers:
2019 Chrysler Pacifica Limited: Mommy's new RGC
2015 Chrysler Town & Country Limited Platinum: Kids new RGC
2011 Camaro SS
2009 Pontiac G8 GT: L76, Sport Red Metallic
2004 GMC Sierra 2500HD: Victory Red - 8.1L Big Block and Allison
2003 Chevrolet Suburban 2500: Doeskin Tan - 8.1L Big Block... RIP
1999 Chevrolet Suburban: Sunset Gold Metallic - RIP
-
CMNTMXR57
- Certified Bonneville Nut
- Posts: 5841
- Joined: Wed May 13, 2009 10:45 pm
- Year and Trim: 2006 STS-V, 2004 GTO, 2009 G8 GT
- Location: CHICAGO
Re: Working on my LD8...
You can see in your picture above. That orange piece is the gasket, with the metal frame/wire in between the two orange rubber parts. On the cam cover side, I seem to recall two ridges that help align it with the groove in the cam cover.
So once installed on the cam cover, it's pretty foolproof in terms of positioning and installation (along with those triangular tabs around the perimeter of the gasket to hold it to the cam cover), onto the head itself. Not to say it's a perfect solution, but it could be a lot worse.
Once I had the cover onto the head, before I bolted it down, I ran my finger the perimeter of the gasket, to ensure it was in the groove in the cam cover. Once satisfied it was installed/fitted in the cam cover properly, only then did I make final installation.
Retired Bonneville Owner and former GM Tech:
2004 Pontiac Bonneville GXP: Black/Ebony *SOLD*
Summer Toys: Combined 827 RWHP / 877lb/ft RWTQ
2004 Pontiac GTO: Impulse Blue Metallic/Black/M6: lots 'o mods, 415 RWHP / 405lb/ft RWTQ!
2006 Cadillac STS-V: Light Platinum Metallic/Light Gray/A6 - Spectre CAI, Magnaflow exhaust, Speed Inc. tune, 412 RWHP / 472lb/ft RWTQ
Daily Drivers:
2019 Chrysler Pacifica Limited: Mommy's new RGC
2015 Chrysler Town & Country Limited Platinum: Kids new RGC
2011 Camaro SS
2009 Pontiac G8 GT: L76, Sport Red Metallic
2004 GMC Sierra 2500HD: Victory Red - 8.1L Big Block and Allison
2003 Chevrolet Suburban 2500: Doeskin Tan - 8.1L Big Block... RIP
1999 Chevrolet Suburban: Sunset Gold Metallic - RIP
-
ddalder
- Resident Gearhead
- Posts: 2599
- Joined: Wed Apr 01, 2009 7:11 pm
- Year and Trim: 2004 GXP, 2008 STS, 2020 XT6
- Location: Alberta, Canada
Re: Working on my LD8...
It is exactly as you describe. I'm actually very impressed with how the gasket seems to be designed and manufactured. This is why I'm so confused about why they are so problematic. I'll have another look, but I wonder if the leak occurs between the gasket and the cam cover versus the gasket and head. I'm reluctant to put any sealant between the gasket and head, but I wonder if a very small amount between the gasket and cam cover might not be a bad idea? Just enough to fill the dead space where the gasket sits in the groove.
Bose Luxury Sound System w/Touch Screen Navigation, Addition of Factory XM, 2005 MY Antenna, OnStar Upgrade (3G),
RainSense Wipers, Backup Camera, '00 Style Door Panel Courtesy Lights, Heated Washer Solvent, 2X Remote Trunk Release,
Turn Signal Mirrors, Center Console Courtesy Lamp, Rear Outboard Heated Seats, PVD Chrome 18" Factory Rims, Upgraded
Carbon Fibre Appearance Interior Trim, Highly Modified Main Body Harness, Instrument Panel, Door, Door Panel & Headliner
Wiring Harnesses, Custom Fuse Box & Tire and Loading Information Decals, Additional Acoustic Insulation[/size][/color]
-
CMNTMXR57
- Certified Bonneville Nut
- Posts: 5841
- Joined: Wed May 13, 2009 10:45 pm
- Year and Trim: 2006 STS-V, 2004 GTO, 2009 G8 GT
- Location: CHICAGO
Re: Working on my LD8...
Again, I get back to the torque specs on those *dang* bolts as the main culprit.
Could there be gaps as you mention? Perhaps. I tried to solve for that though, by ensuring that I had it all in place before bolting it down. But best laid plans sometimes never work... After doing the back on mine, it was good for about 6 months. Then sure as chit, the *dang* thing started leaking again. So again, re-checked the torque. Some were loose again. So that's when I loctited them and went 10.
Then about a year later... It started leaking again... In particular the rear corner on the passenger side, up against the firewall. Re-checked the torque, all at 10 lb/ft. WTF!? So at this point in time, I said "F" it, I had enough. This was a DD not some pristine show car, no one else other tham myself is going to know, and I needed to stop smelling burnt oil at stop lights. I cleaned that section and I JB welded that immediate corner. Never saw another drop of oil in the remaining time I owned it.
Retired Bonneville Owner and former GM Tech:
2004 Pontiac Bonneville GXP: Black/Ebony *SOLD*
Summer Toys: Combined 827 RWHP / 877lb/ft RWTQ
2004 Pontiac GTO: Impulse Blue Metallic/Black/M6: lots 'o mods, 415 RWHP / 405lb/ft RWTQ!
2006 Cadillac STS-V: Light Platinum Metallic/Light Gray/A6 - Spectre CAI, Magnaflow exhaust, Speed Inc. tune, 412 RWHP / 472lb/ft RWTQ
Daily Drivers:
2019 Chrysler Pacifica Limited: Mommy's new RGC
2015 Chrysler Town & Country Limited Platinum: Kids new RGC
2011 Camaro SS
2009 Pontiac G8 GT: L76, Sport Red Metallic
2004 GMC Sierra 2500HD: Victory Red - 8.1L Big Block and Allison
2003 Chevrolet Suburban 2500: Doeskin Tan - 8.1L Big Block... RIP
1999 Chevrolet Suburban: Sunset Gold Metallic - RIP
-
ddalder
- Resident Gearhead
- Posts: 2599
- Joined: Wed Apr 01, 2009 7:11 pm
- Year and Trim: 2004 GXP, 2008 STS, 2020 XT6
- Location: Alberta, Canada
Re: Working on my LD8...
I got started on my engine work today. I was able to get the crossover out without a great deal of difficulty. Honestly, I think the hard part will be getting it back in. I can see why everyone says it's a big job. It is, but it's not really difficult with patience and a few of the right tools.
Task #1 was to create a more spacious work environment. I raised the hood to a perfectly vertical position. This also allowed me to move the hood struts out of the way.

Once it was out the first thing I discovered was the remnants of quality workmanship. Back about 35,000km the dealer had my transmission out. It seems that they didn't feel it was necessary to tighten up ALL the bolts. This one only helps hold the transmission to the engine so no biggy!

For those of you that haven't seen one, here's what the crossover looks like. It houses the water pump. The throttle body and EGR attach to it as well.

Here's the engine, less the crossover...
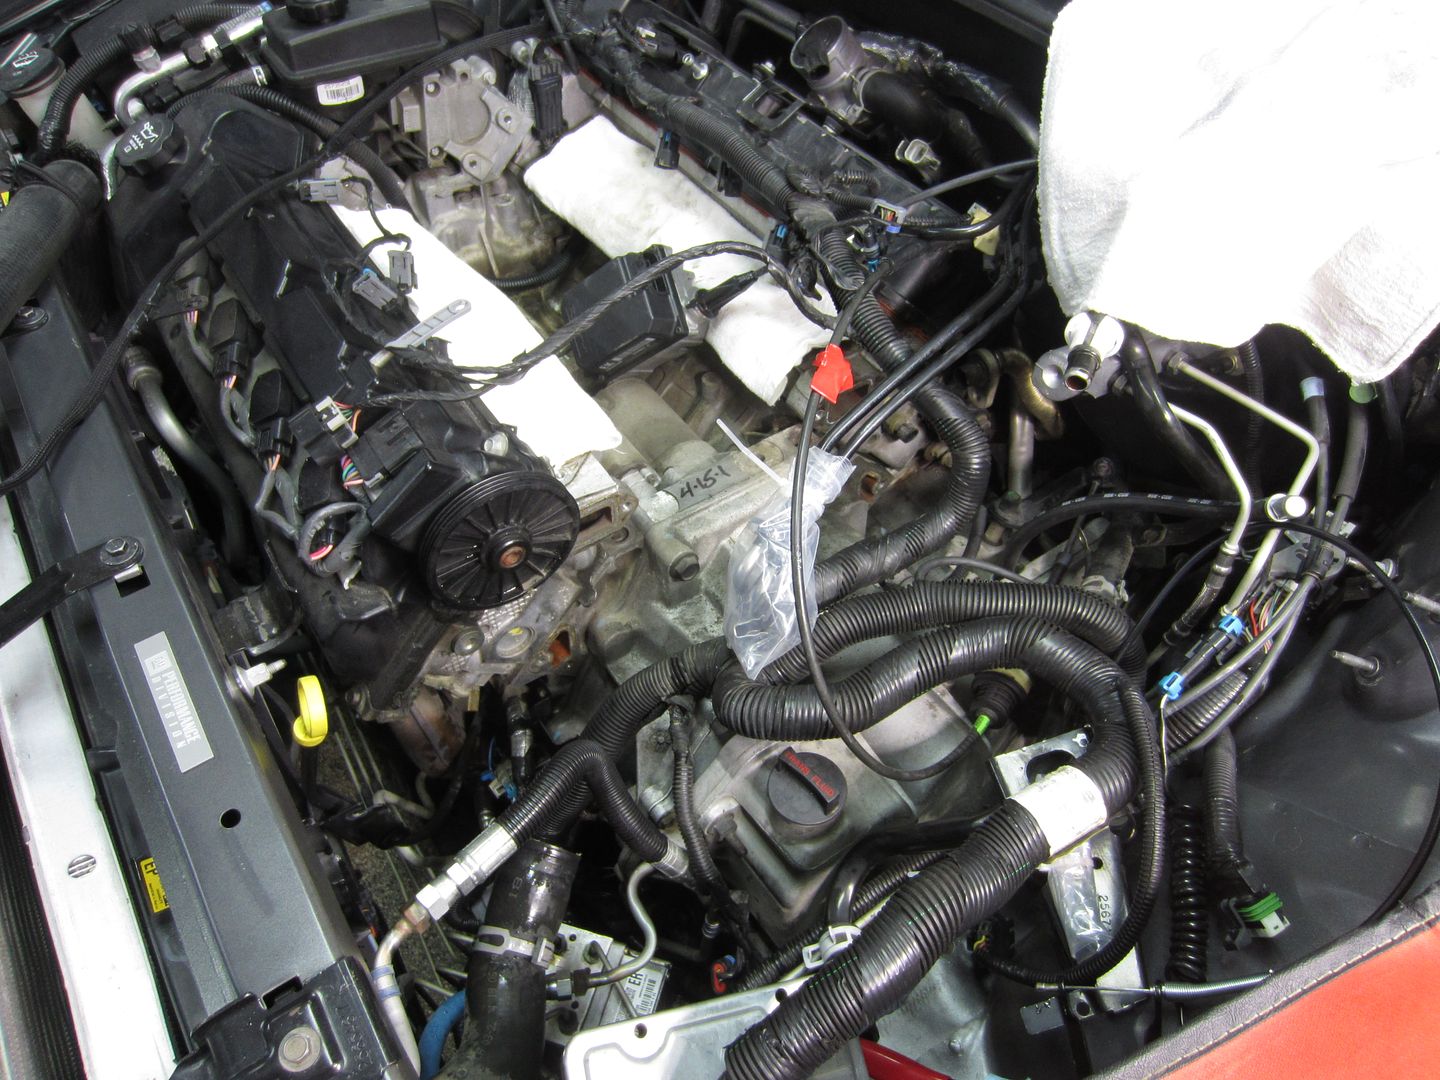
Looky, looky! Could this be a gasket failure??? Two of the remaining three had similar failures but this one was definitely the worst.

Task #1 was to create a more spacious work environment. I raised the hood to a perfectly vertical position. This also allowed me to move the hood struts out of the way.
Once it was out the first thing I discovered was the remnants of quality workmanship. Back about 35,000km the dealer had my transmission out. It seems that they didn't feel it was necessary to tighten up ALL the bolts. This one only helps hold the transmission to the engine so no biggy!
For those of you that haven't seen one, here's what the crossover looks like. It houses the water pump. The throttle body and EGR attach to it as well.
Here's the engine, less the crossover...
Looky, looky! Could this be a gasket failure??? Two of the remaining three had similar failures but this one was definitely the worst.
Bose Luxury Sound System w/Touch Screen Navigation, Addition of Factory XM, 2005 MY Antenna, OnStar Upgrade (3G),
RainSense Wipers, Backup Camera, '00 Style Door Panel Courtesy Lights, Heated Washer Solvent, 2X Remote Trunk Release,
Turn Signal Mirrors, Center Console Courtesy Lamp, Rear Outboard Heated Seats, PVD Chrome 18" Factory Rims, Upgraded
Carbon Fibre Appearance Interior Trim, Highly Modified Main Body Harness, Instrument Panel, Door, Door Panel & Headliner
Wiring Harnesses, Custom Fuse Box & Tire and Loading Information Decals, Additional Acoustic Insulation[/size][/color]