Page 3 of 7
Re: How to: 2000+ radio light fix tutorial (45pics)
Posted: Sat May 15, 2010 10:52 am
by harofreak00
Even easier.
Re: How to: 2000+ radio light fix tutorial (45pics)
Posted: Mon May 17, 2010 9:37 pm
by Maccaguy
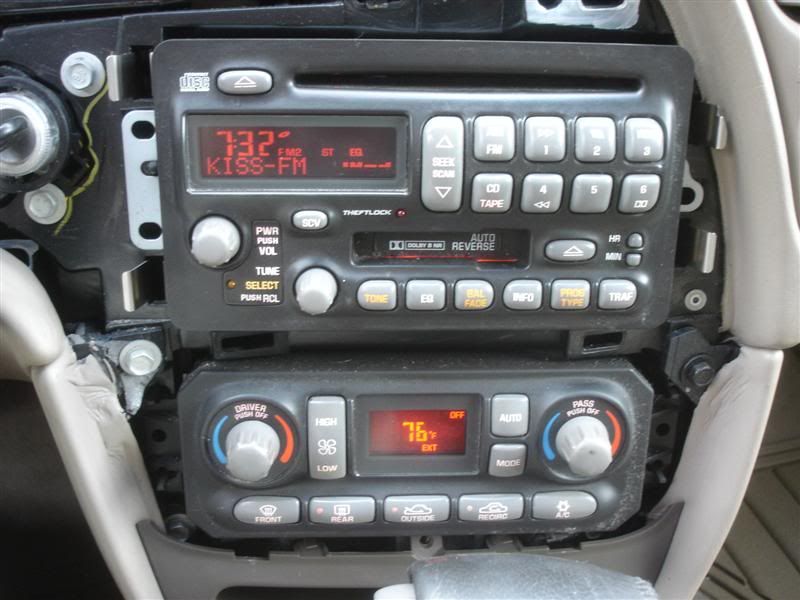
Thanks again! The climate control repair was easier than the radio, and now her interior displays are all 100% functional.
Re: How to: 2000+ radio light fix tutorial (45pics)
Posted: Wed May 19, 2010 10:32 pm
by imidazol97
Maccaguy wrote:I just did this repair to my wife's 2000 Bonneville today, and it worked great! I sourced all the lights at Radio Shack, since I'm cheap. I just thought I'd ask if the lights in the climate controls were as easily replaceable? The 4 left hand side buttons (front and rear defrost, winshield/feet, and feet) aren't lighting up. Is this a different type of repair, or basically the same thing?!
Which part number bulbs did you use from Radio Shack?
Re: How to: 2000+ radio light fix tutorial (45pics)
Posted: Thu Jun 03, 2010 3:22 pm
by 03zq8
I wanted to bump this thread for two reasons. One is to say thanks for the outstanding write-up.
Secondly, I used the 272-1154 bulbs from Radio Shack for the whole radio, and it worked very well. The brightness is probably a *fuzz* less than the factory setup, but satisfactory.
I wanted to include a few pics for reference.
Re: How to: 2000+ radio light fix tutorial (45pics)
Posted: Sun Jun 13, 2010 1:21 pm
by 94SilverSSEi
Would this same procedure work for 96-99 or is it totally different?
Re: How to: 2000+ radio light fix tutorial (45pics)
Posted: Sun Jun 13, 2010 11:27 pm
by bonnevillain
Totally different radio and bulbs locations, but the principle is the same i guess.
Re: How to: 2000+ radio light fix tutorial (45pics)
Posted: Sun Jun 27, 2010 6:55 pm
by ablebakercharlie
Just did this fix to my 03. A couple notes:
The lamps in the heated seat controls are also very similar to the Radio Shack bulbs; the RS bulbs are a bit brighter. You need to know how to solder to do those, though. The seat heater control lamps are in surface mount carriers. Pry out the base of the switch and they are easily accessible. I replaced 3 of the 4 in the two switches as they were out.
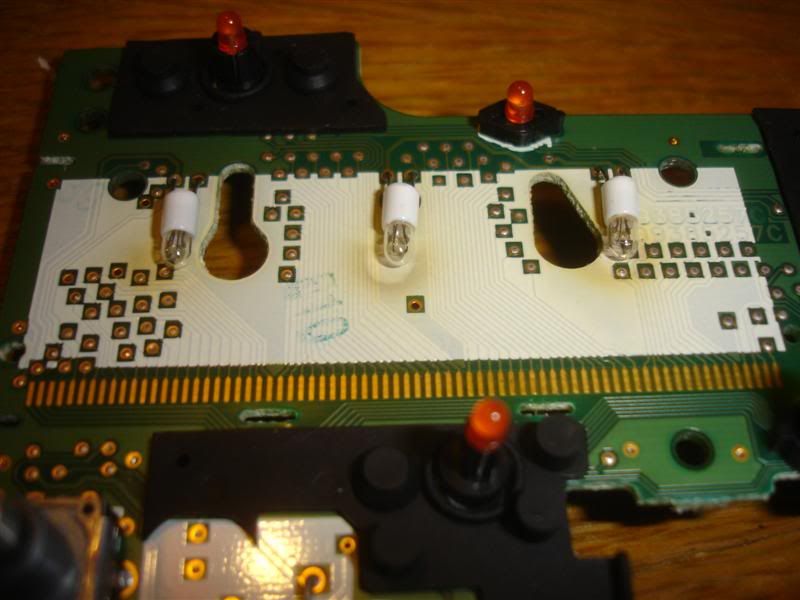
I also used the RS lamps for the three keypad lamps on the radio, but instead of the dimmer than stock RS lamps for the LCD display, I used three #74 lamps (standard auto lamps, 12v, 100mA). Pry up the wire leads, sand off the oxidation, tin them with a hot iron, and solder in place. They are clearly brighter than the RS lamps.
I was only able to install one of the white silicone "condoms" over the new lamps. It DOES make a difference; if you can, do, it increases apparent brightness noticeably.
/Ed
2003 Bonneville SLE
Re: How to: 2000+ radio light fix tutorial (45pics)
Posted: Thu Jul 01, 2010 12:43 am
by xdhd350
Just did my radio last week with the RS bulbs. They are correct for the 3 smaller bulbs behind the buttons, but are a bit smaller than the frosted bulbs behind the display. For that I used a slightly larger bulb I got at the local electronics shop. They weren't frosted so I gently (and I DO MEAN gently) rubbed them over some 120 grit until they frosted up. Sure enough, they work great for the display back lighting. Nice and diffused.
Next up, a few burned out bulbs in the steering wheel radio controls. Does anyone know what bulbs those are and how I can get to them?
I want to thank all those in this thread for the tutorials and bulb locating. That RS bulb is a good find!
GregB
Re: How to: 2000+ radio light fix tutorial (45pics)
Posted: Thu Jul 01, 2010 3:13 am
by harofreak00
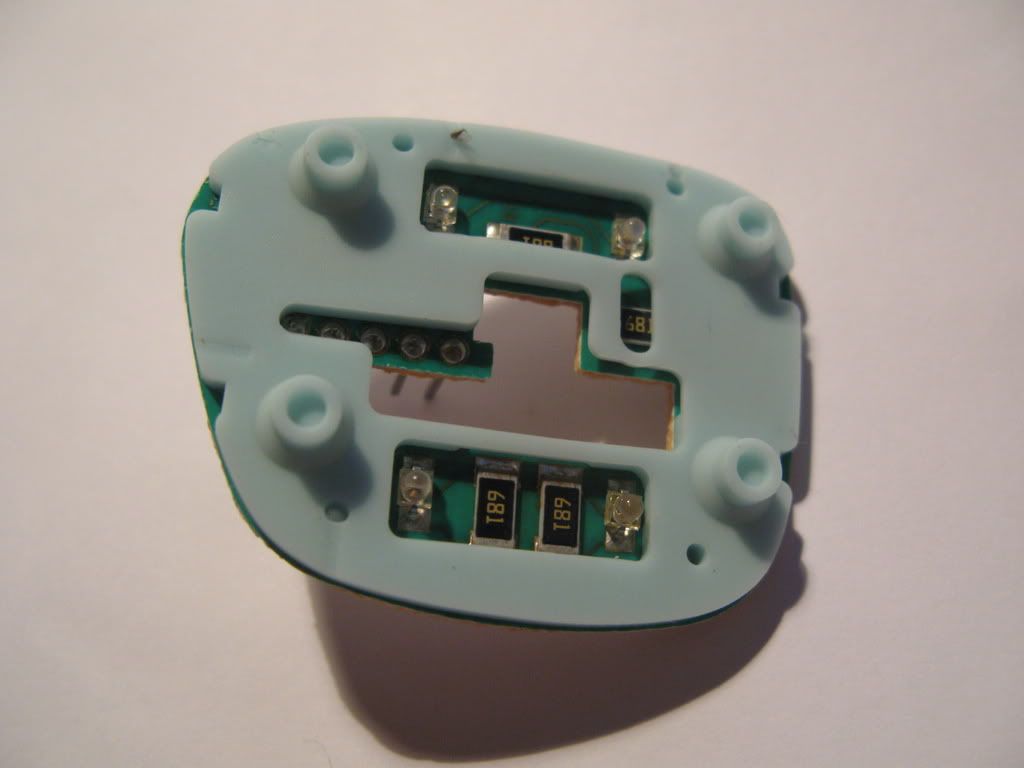
The steering wheel buttons are surface mount LEDs and will probably be more trouble/cost more to replace than to just buy a new set (I sell them for $20)
Re: How to: 2000+ radio light fix tutorial (45pics)
Posted: Thu Jul 01, 2010 1:05 pm
by xdhd350
harofreak00 wrote:The steering wheel buttons are surface mount LEDs and will probably be more trouble/cost more to replace than to just buy a new set (I sell them for $20)
Sounds like a plan. But how do I get the assembly out? Doesn't look like they can pop out of the front side. I gotta pull the steering wheel anyway to do a clock spring check/replacement.
Re: How to: 2000+ radio light fix tutorial (45pics)
Posted: Thu Jul 01, 2010 1:11 pm
by harofreak00
They do pull straight out, wiggle back and worth while pulling. They are only held in with friction. The wires aren't very long on the backside, so you might have a hard time disconnecting the connector.
Re: How to: 2000+ radio light fix tutorial (45pics)
Posted: Fri Jul 02, 2010 2:47 pm
by jeffnohio
Hi guys .. We just bought this car 3 days ago and want to thank you so much for your valuable info on this web site.. I have bought the 6 bulbs from radio shack.. and am almost ready to head down stairs and tackle this.. but I am still worried about the whole security lock thing on the radio.. I went through the stock owners manual and am not sure if I should disconnect the battery before taking out the radio to prevent it from locking or how exactly this works.. do I put the key in and do something to make it safe to disconnect.. anyway i will wait to see if there are any replies before attempting to unplug the harness.. so i dont end up with a nice lit display and a un useable stereo/cd player..
but for now Im off to see if there is any info on here pertaining to the dual climate control air problem I am having.. cold air out passenger side only..... And fresh vent air and or hot air out of driver side vents The actuator motor on driver side will work to gain heater core heated air and seeming ambient warm air .. but will not let clod air from the evaporator onto this side.. hmmmmmm.. again .. Thank you guys so much for this wealth of info.
Jeff
Re: How to: 2000+ radio light fix tutorial (45pics)
Posted: Fri Jul 02, 2010 2:49 pm
by 00Beast
As long as the radio is programmed to your car, it'll be fine no matter if there's power or not when it's taken out. It is programmed to your car, and will always work in your car unless the programming is changed by a Tech II.
Re: How to: 2000+ radio light fix tutorial (45pics)
Posted: Fri Jul 02, 2010 2:52 pm
by jeffnohio
wow that was fast!!!!!.. ok thank you a ton .. im going out now to pull it then .. will post back my result after it is completed
Re: How to: 2000+ radio light fix tutorial (45pics)
Posted: Sat Jul 03, 2010 8:04 pm
by jeffnohio
ok got em all soldiered in and they work like a charm .. but the lcd display does some funny stuff after about 5 mins. the numbers for the clock start going all wonkey and are un readable . Im wondering if I should have soldiered the 6 points where the metal bends over to hold it in place.. it kinda looked like it was before.. ???
anyway Thank you guys I would have never gotten this far with out the aid of thie forum.
Jeff
Re: How to: 2000+ radio light fix tutorial (45pics)
Posted: Sat Jul 03, 2010 8:57 pm
by imidazol97
jeffnohio wrote:but for now Im off to see if there is any info on here pertaining to the dual climate control air problem I am having.. cold air out passenger side only..... And fresh vent air and or hot air out of driver side vents The actuator motor on driver side will work to gain heater core heated air and seeming ambient warm air .. but will not let clod air from the evaporator onto this side.. hmmmmmm.. again ..Jeff
You've almost answered your own question on the warm air driver's side. It usually is low freon charge. If you do it yourself, Buy a gauge and can of plain freon 134a from Walmart and fill to the to of the OK section with the AC running on high. Low freon lets the part of the evaporator that the air for the passenger travels through cool off and the driver's side gets no cooling or almost none. If you run the AC when the outside temps is fairly cool, the driver's side will probably get chilled some before the freon is all warmed up and expanded; but on hot high load days, that freon just isn't able.
Re: How to: 2000+ radio light fix tutorial (45pics)
Posted: Mon Jul 05, 2010 6:48 pm
by jeffnohio
Thanks man I will give that a try and keep my fingers crossed... And sorry for letting this veer off topic..
Jeff
Re: How to: 2000+ radio light fix tutorial (45pics)
Posted: Sat Jul 24, 2010 2:24 pm
by ironoxide
Okay! First thanks for such an informative post. I was able to complete the repair in 3 hours today - how nice it is to have a display in my radio again! I had all three display bulbs burned out as well as the lower three illuminating the bottom row of buttons. A bit of a learning curve removing the originals, and a bit of a learning curve installing the new: I could do it in half the time it took me today if I had to do again. I used all radiation shock bulbs: for the bottom row I used the 272-1154 - these appear identical to the oem with the plastic base. For the display I used the 272-1092 - these are plenty bright enough!
*** technique employed installing the new bulbs: (1) Placed a small needle held in my pliars in the hole. (2) Held the soldering iron to the needle to heat the needle and create a small "starter hole" for the small bulb leads. (3) Positioned the leads in those holes, and softened the solder from the back as I pushed the new bulbs in place. All bulbs workin' great! Cost: ~$10.00.

Re: How to: 2000+ radio light fix tutorial (45pics)
Posted: Sat Jul 24, 2010 7:24 pm
by ironoxide
Just wanted to add - the display bulbs should be brighter than what the 272-1092's are. It's all good in the shade or night, but in full sun, they lack the illumination you would expect. They do work though. Okay if you're not fussy about it: better than none at all fore sure.
Re: How to: 2000+ radio light fix tutorial (45pics)
Posted: Wed Jun 01, 2011 2:40 pm
by locowbl
In the beginning of the tutorial you mentioned the 2174 bulb. Did you find out if it could be used in leiu of the bulbs from corvette radio parts?