Our '99 Bonneville (Granny)

Post pictures, sounds, and VIDEOS of your 3800 or Northstar powered Bonnie/Grand Prix(H & W Body ),Buick( H & C Body ) or Oldsmobile( H,C,G & W Body ) here. We want to see 'em! (Any picture or video files must be posted on a server somewhere to be linked here). Also post pics of Regional or National meets. THERE IS A 25-PIC LIMIT PER PAGE IN THIS FORUM. ADDITIONAL PICS MUST BE LINKS TO AN ALBUM OR TO INDIVIDUAL PICS. Meets are exempt from this restriction.
User avatar
TheLoyale
SLE Member
SLE Member
Posts: 67
Joined: Thu Mar 27, 2014 1:59 pm
Year and Trim: 1999 Bonneville SE (Granny)
162,000
Location: Waukesha, WI
Contact:

Re: Our '99 Bonneville (Granny)

Post by TheLoyale »

EDITED:

Thanks for the kind comment :) After a good long look at wheels next to a picture of the car, I think I finally found a winner.

Pictures.
Image

Image
User avatar
TheLoyale
SLE Member
SLE Member
Posts: 67
Joined: Thu Mar 27, 2014 1:59 pm
Year and Trim: 1999 Bonneville SE (Granny)
162,000
Location: Waukesha, WI
Contact:

Re: Our '99 Bonneville (Granny)

Post by TheLoyale »

Just wanted to test the waters. Would there be any interest if this car came up for sale? I'm thinking price would be $4,500obo. As you can see thru the thread, I've put a lot of time into the car. Its turn key and go, needs nothing (Except for some summer rubber)

We have been tossing the idea back and forth of selling the good ole' Bonne before I buy Summer shoes for it.

Cheers all!
-Tom
User avatar
TheLoyale
SLE Member
SLE Member
Posts: 67
Joined: Thu Mar 27, 2014 1:59 pm
Year and Trim: 1999 Bonneville SE (Granny)
162,000
Location: Waukesha, WI
Contact:

Re: Our '99 Bonneville (Granny)

Post by TheLoyale »

Sunday I went out to get in the car and noticed a 16" diameter puddle under the front passenger side; which turned out to be coolant. So I jacked up and and noticed the coolant was leaking from above the power steering reservoir, Grabbed a flashlight and looked at the lower coolant bypass elbow and sure enough it was the culprit!

So since I already had the Aluminum dorman elbows handy, I replaced both Monday. This could be a 30min job as its pretty easy, but I took some extra time to clean things up with degreaser. I also noticed that both of the old coolant elbows were cracked off where the O-ring goes into the intake. Someone had once spooled RTV over the area, which must have worked up until 163k ;)

So a few pics of the job.
Image

Image

After removing the elbows. I also noticed these say "Made in China" are these genuine?
Image

New replacements.
Image

Image

All finished up.
Image
User avatar
98SSE
Posts like an LN3
Posts like an LN3
Posts: 426
Joined: Sat Apr 19, 2014 7:51 pm
Year and Trim: 2001 SSEI/2007 TBSS/2004 CTS-V
Location: Columbus, Ohio

Re: Our '99 Bonneville (Granny)

Post by 98SSE »

Looking good. Intake gasket ever been done?
2001 Bonneville SSEI (His) - Gen V/3.5 pulley/CAI/SD Headers/ZZP 1.9 Rockers/90# Springs/Magnaflow Converter/HP Tuners/180* T-Stat/Trans-Go Shift Kit/TruCool Transmission Cooler/ F-Body Front Brakes/STS Rear Brakes/Tint/GXP Interior September 2015 COTM

2007 Trailblazer SS (Hers) - PCM4Less tune, E-Fans, SLP PowerFlo Exhaust, Hotchkis Sways, PML Tranny Pan, Powerstop Brakes,
"Big 3", Tint

2004 CTS-V (His) - B&B Exhaust, LS7 clutch, HIDs, LED fogs, Powerstop Brakes, Tint

Image
1oldman
Certified Bonneville Nut
Posts: 3975
Joined: Tue May 04, 2010 11:21 pm
Year and Trim: 2017 Hyundai Santa Fe Sport
Location: Lone Star State

Re: Our '99 Bonneville (Granny)

Post by 1oldman »

Nice looking work. - BC
In Memory of Brad - 1/21/1977 .. 10/23/2013 ...... Aaron - 1977 .. 2017 .....
2017 Hyundai Santa Fe Sport ..... 1992 Bonneville SSE 1SB 170 HP L27 4T60E retired/sold to MattStrike ..... 2005 Bonneville SE 1SC 205 HP L36 4T65E - retired/salvage yard ..... PBCF user 2321
User avatar
TheLoyale
SLE Member
SLE Member
Posts: 67
Joined: Thu Mar 27, 2014 1:59 pm
Year and Trim: 1999 Bonneville SE (Granny)
162,000
Location: Waukesha, WI
Contact:

Re: Our '99 Bonneville (Granny)

Post by TheLoyale »

No the intake gasket leaks pretty good, nice pools of oil sit in the Manifold and Head castings. Been wanting to change it out, but I really don't want to pull the Fuel rail off to do it. I hate getting Injectors reseated haha. Maybe I'll get to it before the motor bursts into flames :p

-Tom
User avatar
TheLoyale
SLE Member
SLE Member
Posts: 67
Joined: Thu Mar 27, 2014 1:59 pm
Year and Trim: 1999 Bonneville SE (Granny)
162,000
Location: Waukesha, WI
Contact:

Re: Our '99 Bonneville (Granny)

Post by TheLoyale »

Finally got off the winter tires and put on some 18x8 Rial Leichtmetallfelgen P10 wrapped in 235/45/18 General G-Max AS-03. Rides pretty good, less sidewall scrub and better steering response. Pretty happy with the result!

Image

Image

Image

Image

Cheers all!
-Tom
96 SSEi
Posts like a Northstar
Posts: 1813
Joined: Sun Aug 22, 2010 11:11 pm
Year and Trim: 2000 Bonniville SSEi L67
Location: Ontario, Canada

Re: Our '99 Bonneville (Granny)

Post by 96 SSEi »

looks great for a ride that's pushing 2 decades
poverty forces one to do unorthodox things

2000 SSEi
past rides:
1996 SSEi
1992 GTP
1987 Grand Am
User avatar
WhiteArrow3800
Moderator / Social Dev
Posts: 5962
Joined: Tue May 20, 2008 11:52 pm
Year and Trim: ___
2001 Bonneville SSEi
2009 Pontiac G8 GT
Location: Williamsburg, Va

Re: Our '99 Bonneville (Granny)

Post by WhiteArrow3800 »

Wow those look much better on the car than I figured! Great choice!
Image
'93 SSE "Guinevere" RIP 1993 - 2019
'01 SSEi "Chloe" Mods: Intense FWI | GenV | WBS Intercooled | 3.2 MPS | 1.9 YT Rockers | SSAC Headers | N* TB | TEP Trans | 3.29 FDR | Torsen LSD
DTM Tuned | Dual AeroForce | Solid Mounts | 255 Walbro Pump | Fuel Logs | GXP STB & Sway Bars | CSS Lowering Springs | GXP Brakes | Disabled DRL
Magnaflow Mufflers | Magnaflow Cat | GXP Seats & Trim | 35 % Tint | Cleared & Tinted Tails | repinS Retrofited Morimoto Mini H1 | 19" GT500 Wheels
'09 G8 GT "Abigail" Mods: Rotofab | LS3 Heads, Intake & Cam | Kooks LT | Solo Exhaust | Tien Springs w/ GXP Struts | Whiteline Swaybars | BMR Subframe Connectors
Achievements: Guinevere - 264k mi | 16.27 @ 84.10mph | March '11 COTM :: Chloe - 223k mi | 13.85 @ 102mph | January '09 COTM :: Abigail - 192k mi | 12.85 @ 112mph
User avatar
TheLoyale
SLE Member
SLE Member
Posts: 67
Joined: Thu Mar 27, 2014 1:59 pm
Year and Trim: 1999 Bonneville SE (Granny)
162,000
Location: Waukesha, WI
Contact:

Re: Our '99 Bonneville (Granny)

Post by TheLoyale »

So since I haven't been to a junkyard yet to take a gander, Do all H-body SSEis have larger sway-bars (F/R) than any SE? Also, are they routed the same? I think the next step for this car is definitely larger sways.

I still need to get under the car and see what size is on it now.
User avatar
MattStrike
Certified Bonneville Nut
Posts: 4760
Joined: Tue Aug 25, 2009 8:32 pm
Year and Trim: '99 Montana
'04 Dirtymax
'97 Camaro
'92 Trofeo
Location: SE Michigan

Re: Our '99 Bonneville (Granny)

Post by MattStrike »

All SSEi's and most SSE's have the larger sway bars.
Boost addict
Image

The Fleet:
'93 SSEi - Twincharged + manual Build thread
'97 Camaro - Top swap
'05 STS - V8, AWD, her DD
'92 Trofeo - Fair weather DD
'99 Montana - top swap 3800
'04 Sierra 2500HD - LLY Duramax

Current project:
Something cool, trust me.

Upcoming projects:
'92 Bonneville SSE
'87 LeSabre T-type
'67 LeSabre

Gone to greener pastures:
'84 Sierra Classic - Twin turbo 3800
'97 LeSabre - Top swap

RIP:
'86 LeSabre - pictures
'93 SE - L67
User avatar
98SSE
Posts like an LN3
Posts like an LN3
Posts: 426
Joined: Sat Apr 19, 2014 7:51 pm
Year and Trim: 2001 SSEI/2007 TBSS/2004 CTS-V
Location: Columbus, Ohio

Re: Our '99 Bonneville (Granny)

Post by 98SSE »

Looks good!
2001 Bonneville SSEI (His) - Gen V/3.5 pulley/CAI/SD Headers/ZZP 1.9 Rockers/90# Springs/Magnaflow Converter/HP Tuners/180* T-Stat/Trans-Go Shift Kit/TruCool Transmission Cooler/ F-Body Front Brakes/STS Rear Brakes/Tint/GXP Interior September 2015 COTM

2007 Trailblazer SS (Hers) - PCM4Less tune, E-Fans, SLP PowerFlo Exhaust, Hotchkis Sways, PML Tranny Pan, Powerstop Brakes,
"Big 3", Tint

2004 CTS-V (His) - B&B Exhaust, LS7 clutch, HIDs, LED fogs, Powerstop Brakes, Tint

Image
User avatar
TheLoyale
SLE Member
SLE Member
Posts: 67
Joined: Thu Mar 27, 2014 1:59 pm
Year and Trim: 1999 Bonneville SE (Granny)
162,000
Location: Waukesha, WI
Contact:

Re: Our '99 Bonneville (Granny)

Post by TheLoyale »

Thanks guys!
User avatar
TheLoyale
SLE Member
SLE Member
Posts: 67
Joined: Thu Mar 27, 2014 1:59 pm
Year and Trim: 1999 Bonneville SE (Granny)
162,000
Location: Waukesha, WI
Contact:

Re: Our '99 Bonneville (Granny)

Post by TheLoyale »

Update: Upper and Lower Intake gaskets.

So I am getting ready to replace the upper and lower intake gaskets along with Valve cover seals, as I've noticed a decent amount of Oil in the radiator.

So far I have a new Dorman Upper Intake assembly (Comes with plenum gasket, Throttle assembly seal, PCV and EGR tube, Fuel Injector O-rings and two metal tubes)

I am getting a Fel-Pro lower intake set which comes with a whole bunch of seals and gaskets. It is listed as a "2nd Version" I am guessing it is an improved design? Or do different generation L27s use other styles of gaskets?

I am also getting Fel-pro valve cover seals, which do not come with grommets. Are there any grommets to replace? I'm also getting a genuine Thermostat as well.

Is there anything else I should get or need to know before digging into this? I have an FSM from 1992 which seems kinda vague about the procedure. I plan on getting this done within a weekend.

Anything else, give me a holler :)
-Tom
1oldman
Certified Bonneville Nut
Posts: 3975
Joined: Tue May 04, 2010 11:21 pm
Year and Trim: 2017 Hyundai Santa Fe Sport
Location: Lone Star State

Re: Our '99 Bonneville (Granny)

Post by 1oldman »

TheLoyale wrote:Update: Upper and Lower Intake gaskets.

I am also getting Fel-pro valve cover seals, which do not come with grommets. Are there any grommets to replace? I'm also getting a genuine Thermostat as well.

Anything else, give me a holler :)
-Tom

Felpro Grommet Set Part No. ES 72833 $11.99
http://shop.advanceautoparts.com/p/felp ... r+grommets

hope this helps on the parts. - BC
In Memory of Brad - 1/21/1977 .. 10/23/2013 ...... Aaron - 1977 .. 2017 .....
2017 Hyundai Santa Fe Sport ..... 1992 Bonneville SSE 1SB 170 HP L27 4T60E retired/sold to MattStrike ..... 2005 Bonneville SE 1SC 205 HP L36 4T65E - retired/salvage yard ..... PBCF user 2321
User avatar
TheLoyale
SLE Member
SLE Member
Posts: 67
Joined: Thu Mar 27, 2014 1:59 pm
Year and Trim: 1999 Bonneville SE (Granny)
162,000
Location: Waukesha, WI
Contact:

Re: Our '99 Bonneville (Granny)

Post by TheLoyale »

Awesome, thanks for the part number! Time to start gathering parts.

-Tom
User avatar
TheLoyale
SLE Member
SLE Member
Posts: 67
Joined: Thu Mar 27, 2014 1:59 pm
Year and Trim: 1999 Bonneville SE (Granny)
162,000
Location: Waukesha, WI
Contact:

Re: Our '99 Bonneville (Granny)

Post by TheLoyale »

Gonna be replacing Upper and Lower Intake gaskets, Valve cover seals, Thermostat, Heater Hoses and Rad hoses this weekend. Got everything, went with genuine ACDelco Thermostat. Fel-pro gaskets and Gates Hoses.

Question I have is Torque specs and Sequence for The Upper and Lower intake bolts along with the Valve cover bolts. I have a '92 FSM which lists 88 In.lbs for the Intake and Valve covers. Is this correct?

Torque sequence for the Lower intake Starts in the middle, moves to the left 2, then to the right 2, then the 2 closest to the belts (Front) and finally the two closest to the Trans (Rear) Is this correct, or does any of this change from between '92-'99?
User avatar
TheLoyale
SLE Member
SLE Member
Posts: 67
Joined: Thu Mar 27, 2014 1:59 pm
Year and Trim: 1999 Bonneville SE (Granny)
162,000
Location: Waukesha, WI
Contact:

Re: Our '99 Bonneville (Granny)

Post by TheLoyale »

Well there doesn't seem to be any torque sequence for the upper intake in the FSM, but it does say 22ft.lbs on those bolts. 88 In.lbs on the Lower intake and Valve covers (Which seems a bit much for plastic valve covers with grommets)

Doubled checked and I should have everything needed for the job. One thing is throwing me off though, the FSM shows there is a flat gasket for the Thermostat housing, yet all the Genuine GM part sites I have visited along with O'reilly's does not list said gasket. They only show the Thermostat assy which comes with the rubber seal.

That is how I have the currant Thermostat, hasn't leaked yet anyhow.

Tomorrow I'll snap a few photos during the work for giggles.

-Tom
User avatar
TheLoyale
SLE Member
SLE Member
Posts: 67
Joined: Thu Mar 27, 2014 1:59 pm
Year and Trim: 1999 Bonneville SE (Granny)
162,000
Location: Waukesha, WI
Contact:

Re: Our '99 Bonneville (Granny)

Post by TheLoyale »

After a week everything seems to be holding real good, no leaks that I can see, and no more oil entering the coolant system (There are still a few drops of residual floating around even though I flushed the block and rad)

Anyway, was pretty shocked when I removed the Upper Intake and the Valve covers, only to find gobs of baked on sludge and gunk. It was actually somewhat horrifying! I scrapped as much off as I could while sucking with a vac to keep stuff out of the block. I did change the oil afterwards just to be safe.

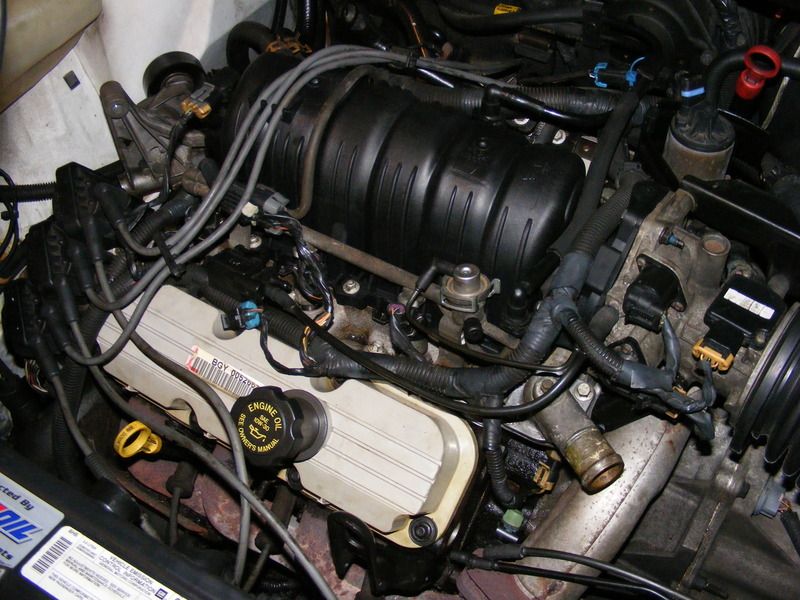
Here are some pictures during the process.

After removing and unclipping a few things, just before removing the Intake and Valve covers.
Image

Image

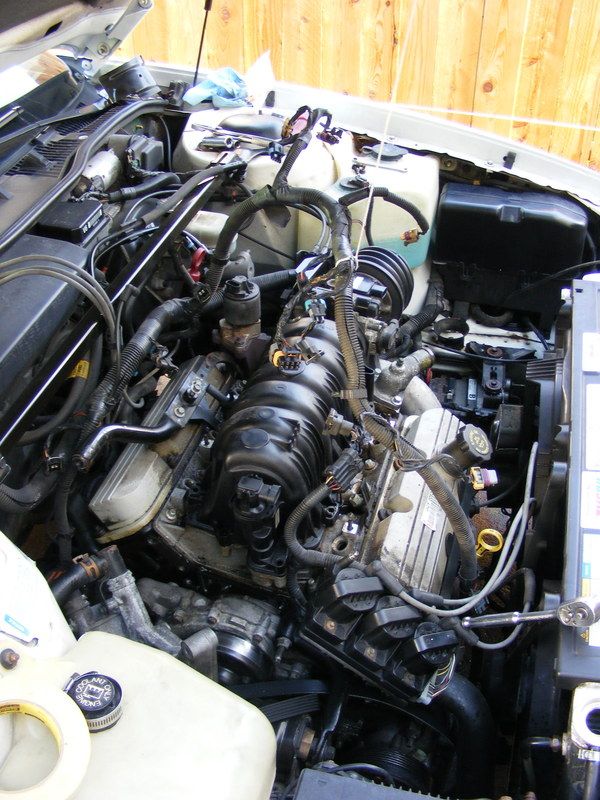
String to hold the harness out of the way.
Image

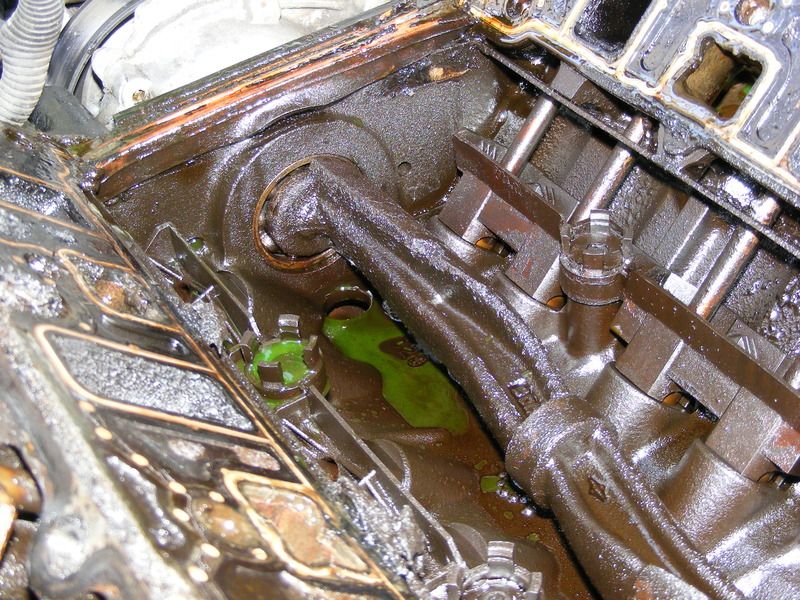
Lots of oil pooling up.
Image

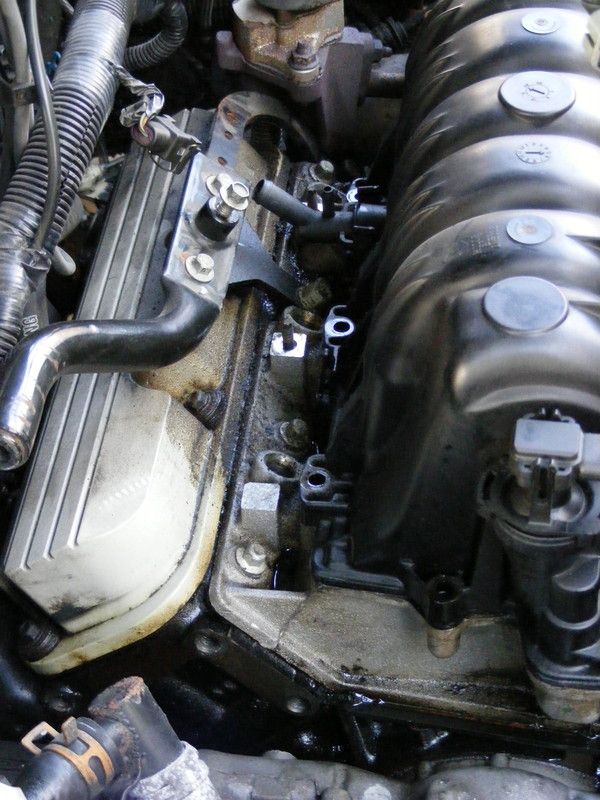
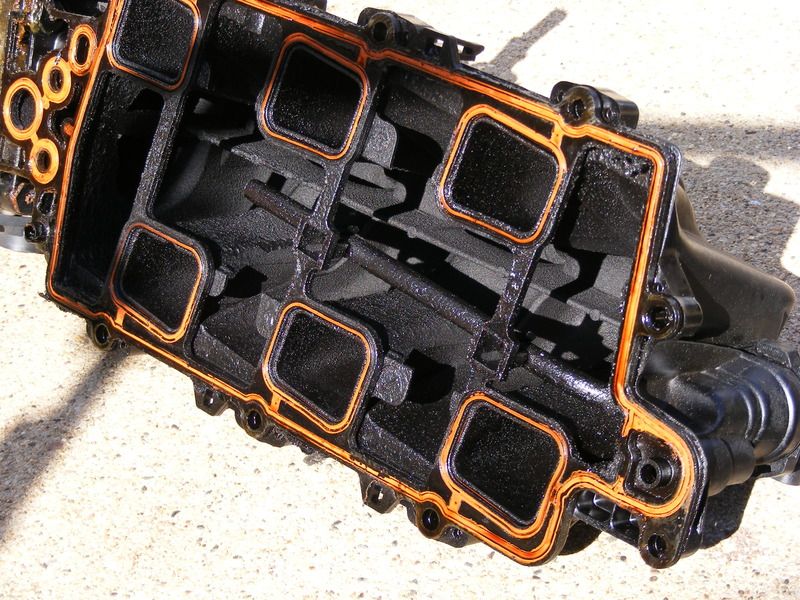
After removing the upper intake, this is what I found. Just slathered in a sooty oil mix of grit. Needless to say I'm happy I bought a new intake just for the sake of not having to clean this one.
Image

Image

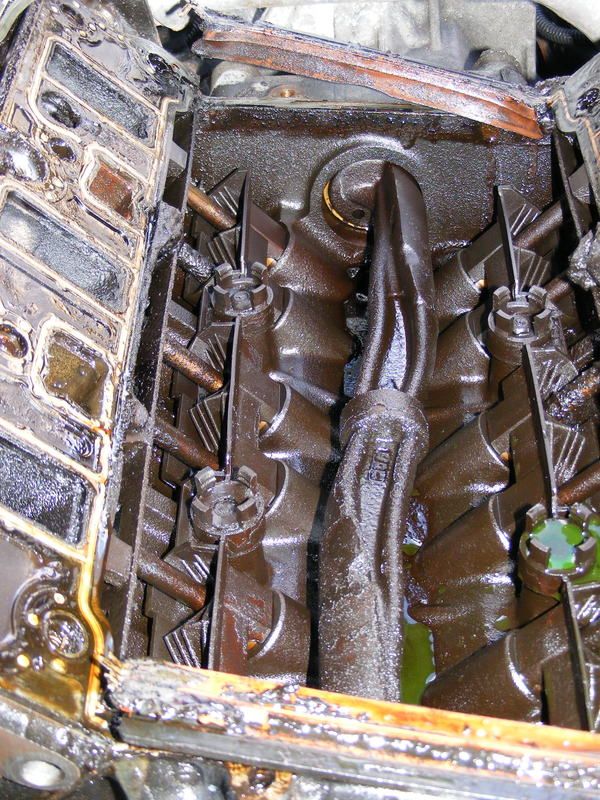
The Lower Intake was no better, actually a lot worse. Some of the passages were caked up and blocked off from this gritty sludge. The valley and balance shaft were pretty caked up as well. I've actually never seen pushrods this built up with oil.
Image

Image

Image

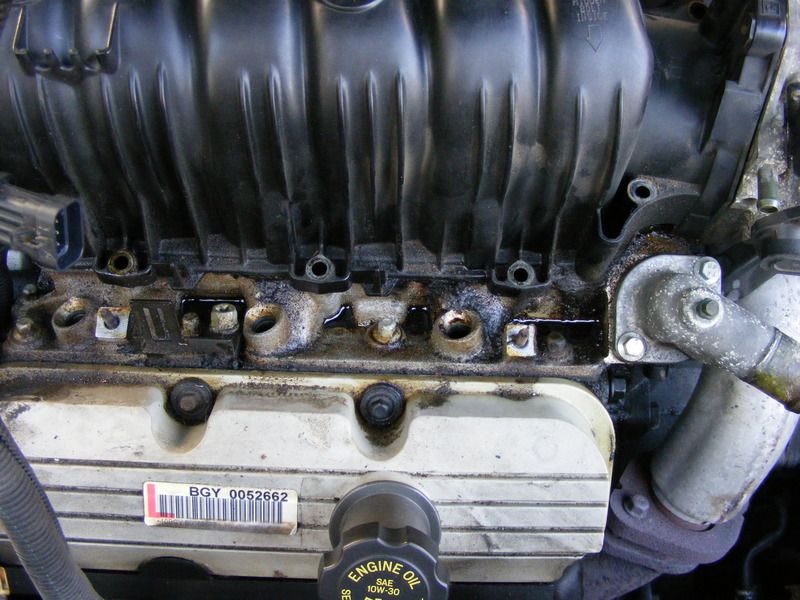
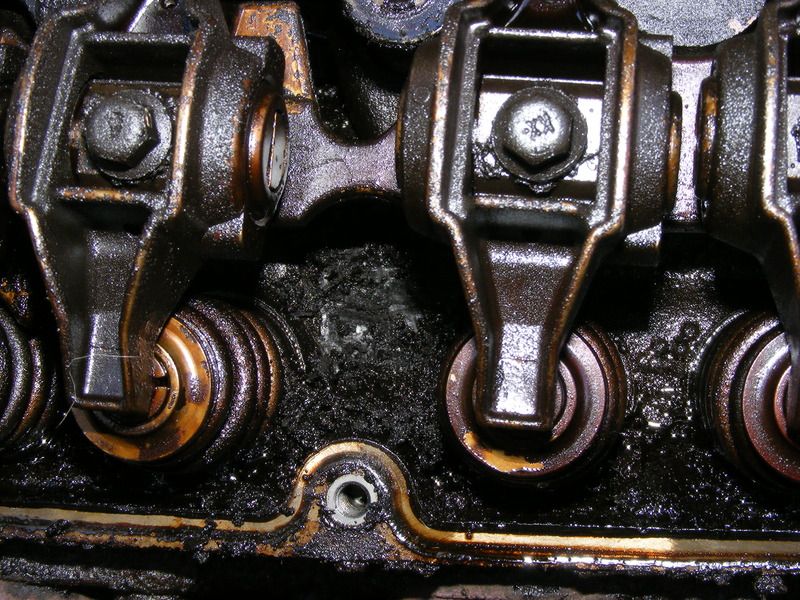
A decent look at the valve springs and the piles of debris all around the heads. Spent about 30min scrapping and sucking to try and clean things up a bit. I did check for play in the rocker arms, everything seems pretty solid surprising, didn't find any slop other than a little norman side to side movement.
Image

And the final result, after soaking the valve covers and lower intake in some oven cleaner and scrubbing the ever loving **** outta them, turned out good, I got the intake pretty clean, the valve covers were a little difficult but most came out.
Image

Installed new Injector O-rings on the bottom side (Where they press into the Intake) nice and sealed, seemed to have a little difficulty getting the quick disconnect on the fuel rail to reseal, but seemed to seal up finally and isn't leaking.
Image

Image

All in all, it was a pretty easy job, took me about 12hrs, most of the time was spent just cleaning things up and also running to the store for some cleaners.

I would have taking some more pictures of the assembly, but it was getting late (12am) and cold (30s) and wanted to get it done.

Up next will be some pictures of the Winter wheels (Factory original) cleaned them up and sprayed them with Black bed liner. All ready for Winter.
Post Reply