

AC Compressor replacement techniques
-
jonnevilleSSEi

- GXP Member

- Posts: 278
- Joined: Sat Dec 11, 2010 9:09 pm
- Year and Trim: '97 SSEi
- Location: Newtown Square, PA
- Contact:
AC Compressor replacement techniques
OK, I did a quick search and came back empty. Next week my friend and I will be replacing the AC compressor on the Jonneville and I'm fairly certain there are some "best practices" known to those who've done them before (or done several.) Does anyone in the forum know of an article that explains any special techniques that will make it easier to remove and replace the compressor? If so, please post a link to it. If there is no such article let's start one here, looking for any tips and tricks, tools required, precautions, etc. to help avoid surprises and speed up the process. The guy I'm working with is familiar with AC systems and is a good mechanic but I know EVERY vehicle model is different and sometimes knowing where to access some hidden fastener can save a load of time on this type of job. Thanks (In Advance)

'97 SSEi, Majestic Teal / Beige interior, Bose, HUD, iPod ready! - SOLD!
'99 Buick Regal LSE, Matador Red / Beige interior - SOLD! Check it out!
'96 Chevy Camaro - White w/Black / fire red interior, 3800, manual, loaded, T-tops, Bose - SOLD! Check it out!
-
jonnevilleSSEi
- GXP Member
- Posts: 278
- Joined: Sat Dec 11, 2010 9:09 pm
- Year and Trim: '97 SSEi
- Location: Newtown Square, PA
- Contact:
Re: AC Compressor replacement techniques
So all these experts around and nobody has advice on replacing the compressor? Not even one of those misleading "It's simple just pop it off, should take you two minutes*"? hmmm.
*I've learned not to believe those responses but at least it's something. Looks like I'll need to learn the tricks of that one the hard way again.

*I've learned not to believe those responses but at least it's something. Looks like I'll need to learn the tricks of that one the hard way again.
'97 SSEi, Majestic Teal / Beige interior, Bose, HUD, iPod ready! - SOLD!
'99 Buick Regal LSE, Matador Red / Beige interior - SOLD! Check it out!
'96 Chevy Camaro - White w/Black / fire red interior, 3800, manual, loaded, T-tops, Bose - SOLD! Check it out!
-
azu

- Posts like an L27

- Posts: 614
- Joined: Wed May 21, 2008 10:00 pm
- Year and Trim: 03 SE
- Location: Sellersville, PA
Re: AC Compressor replacement techniques
Just takes basic tools. Take a/c hoses off first. To get compressor out of car once unbolted move towards passenger side and squeeze through some things right at the wheel well and drop it from the bottom. To place back in just reverse it. I got it out without removing the wheel but if you have the wheel off its a lot easier.
13 Chevy Malibu LS 73K
The only dumb question is the one you didn't ask.
The only dumb question is the one you didn't ask.
-
00Beast
- Retired Site Developer

- Posts: 20960
- Joined: Tue May 27, 2008 10:30 pm
- Year and Trim: '17 Silverado 1500
- Location: MN/IA
- Contact:
Re: AC Compressor replacement techniques
First thing you should do it take it somewhere and have them evacuate the refridgerant, unless it's all leaked out. Undo the belt, wiring connections and hoses, unbolt and repeat. It's not rocket science, just takes a little digging in. You should replace the orifice tube and dryer as well, that's general A/C system practice to replace them when the system is opened. They're the "filters" of the A/C system.
Bye Bye:

RIP sandrock
RIP sandrock
Sirius wrote:Think about it. You’re tooling down the road in your Prius, knowing full-well that this thing being green is as big a sham as federally mandated ethanol-enriched gas, Russia pulling out of Ukraine, and Obamacare.
-
jonnevilleSSEi
- GXP Member
- Posts: 278
- Joined: Sat Dec 11, 2010 9:09 pm
- Year and Trim: '97 SSEi
- Location: Newtown Square, PA
- Contact:
Re: AC Compressor replacement techniques
We tried filling it up a couple of weeks back (before I left town) and it was immediately leaking so we're guessing it's all leaked out. Any suggestions on access to the dryer and the orifice tube? Where are those hidden? Are they as accessible as the compressor?
'97 SSEi, Majestic Teal / Beige interior, Bose, HUD, iPod ready! - SOLD!
'99 Buick Regal LSE, Matador Red / Beige interior - SOLD! Check it out!
'96 Chevy Camaro - White w/Black / fire red interior, 3800, manual, loaded, T-tops, Bose - SOLD! Check it out!
-
1oldman
- Certified Bonneville Nut

- Posts: 3975
- Joined: Tue May 04, 2010 11:21 pm
- Year and Trim: 2017 Hyundai Santa Fe Sport
- Location: Lone Star State
Re: AC Compressor replacement techniques
Find the leak first and fix it. You can buy a dye kit for that. If you don't see the dye with your UV goggles on, check the condensate from the evaporator on the drive way/garage floor.
If you tear it apart, what ever you do, toughly back flush the entire A/C system. Take it apart in sections like the condenser, then do the evaporator, high pressure lines, low pressure lines. Replace the accumulator/drier, orifice and compressor. I am guessing your system is R134.
What ever you do, do not skimp on the quality of your oil or R134. If you do you will pay dearly!
Use a set of digital manifold gauges. It will tell you not only when you have enough & how much Freon in your system, it will tell you how much oil and the type of oil you need. Here is a link to what the gauges look like, but I don’t know if this is actually the gauges you need: http://www.etoolcart.com/acdigitalautom ... 99134.aspx
Use at least one can of this Freon too. You don’t have to use more than one can. You can use the "regular" stuff for the rest of the fill.
http://www.oreillyauto.com/site/c/detai ... &ppt=C0050
And for gosh sakes, pull a vacuum on it and do so for at least as long as the minimum the instructions tell you.
What your components probably look like:
http://www.gmpartsdirect.com/catalog/frameset.cfm
Evaporator components:
http://www.gmpartsdirect.com/catalog/frameset.cfm
Hope I got everything - BC
In Memory of Brad - 1/21/1977 .. 10/23/2013 ...... Aaron - 1977 .. 2017 .....
2017 Hyundai Santa Fe Sport ..... 1992 Bonneville SSE 1SB 170 HP L27 4T60E retired/sold to MattStrike ..... 2005 Bonneville SE 1SC 205 HP L36 4T65E - retired/salvage yard ..... PBCF user 2321
2017 Hyundai Santa Fe Sport ..... 1992 Bonneville SSE 1SB 170 HP L27 4T60E retired/sold to MattStrike ..... 2005 Bonneville SE 1SC 205 HP L36 4T65E - retired/salvage yard ..... PBCF user 2321
-
jonnevilleSSEi
- GXP Member
- Posts: 278
- Joined: Sat Dec 11, 2010 9:09 pm
- Year and Trim: '97 SSEi
- Location: Newtown Square, PA
- Contact:
Re: AC Compressor replacement techniques
Thank you SO much for the details Old Man (& Beast). We know that the compressor leaks, it was visually obviously last coolant fill so we're going to address that first, then I'll need to drive a couple of weeks to make sure that was the only problem. I know the process includes fixing what we know and then seeing if anything else remains (unless we want to just replace everything which means doing it once but costs extra) so I think tomorrow (based on the suggestions of my mechanic and his boss the car sales guy) is to address what we know first and we may be good for years with just that. They are almost an hour from my home so hopefully I won't need to visit there again soon for this. I suppose that only time will tell. I'll keep my fingers crossed (so to speak)
'97 SSEi, Majestic Teal / Beige interior, Bose, HUD, iPod ready! - SOLD!
'99 Buick Regal LSE, Matador Red / Beige interior - SOLD! Check it out!
'96 Chevy Camaro - White w/Black / fire red interior, 3800, manual, loaded, T-tops, Bose - SOLD! Check it out!
-
lunchboxx
- Posts like an LN3

- Posts: 473
- Joined: Wed May 28, 2008 8:28 am
- Year and Trim: 2000 SSEi w/ 99K
- Location: Central Florida SEBF 2008 & 2010 survivor!
Re: AC Compressor replacement techniques
1oldman wrote: And for gosh sakes, pull a vacuum on it and do so for at least as long as the minimum the instructions tell you.
This is vital! Pulling a vacuum lowers the boiling point of ANY water in your system to ambient temperature. At that point, the water just boils to vapor and gets sucked out while pulling the vacuum. Water is the DEATH of your AC system. Also, pulling the vacuum and letting it sit for an hour or so will let you know if you did a good job on fixing your leak before you waste you money on 134 that will leak out if you didnt fix the leak.
-
1oldman
- Certified Bonneville Nut
- Posts: 3975
- Joined: Tue May 04, 2010 11:21 pm
- Year and Trim: 2017 Hyundai Santa Fe Sport
- Location: Lone Star State
Re: AC Compressor replacement techniques
lunchboxx wrote:1oldman wrote: And for gosh sakes, pull a vacuum on it and do so for at least as long as the minimum the instructions tell you.


This is vital! Pulling a vacuum lowers the boiling point of ANY water in your system to ambient temperature. At that point, the water just boils to vapor and gets sucked out while pulling the vacuum. Water is the DEATH of your AC system. Also, pulling the vacuum and letting it sit for an hour or so will let you know if you did a good job on fixing your leak before you waste you money on 134 that will leak out if you didnt fix the leak.
Last edited by 1oldman on Thu May 12, 2011 1:35 am, edited 1 time in total.
In Memory of Brad - 1/21/1977 .. 10/23/2013 ...... Aaron - 1977 .. 2017 .....
2017 Hyundai Santa Fe Sport ..... 1992 Bonneville SSE 1SB 170 HP L27 4T60E retired/sold to MattStrike ..... 2005 Bonneville SE 1SC 205 HP L36 4T65E - retired/salvage yard ..... PBCF user 2321
2017 Hyundai Santa Fe Sport ..... 1992 Bonneville SSE 1SB 170 HP L27 4T60E retired/sold to MattStrike ..... 2005 Bonneville SE 1SC 205 HP L36 4T65E - retired/salvage yard ..... PBCF user 2321
-
jonnevilleSSEi
- GXP Member
- Posts: 278
- Joined: Sat Dec 11, 2010 9:09 pm
- Year and Trim: '97 SSEi
- Location: Newtown Square, PA
- Contact:
Re: AC Compressor replacement techniques
OK, a couple of things I learned in the process. Most importanty my "friend" the mechanic was in a "mood" and this time was "less ok" with me taking photos and hovering while he worked so I didn't get as much content as I like to nor was I able to help out as much, but the images got the gist of it.
My friend whom the mech. works for is a used car guy. In that biz, you fix only what needs to be fixed. My current "budget" suggests the same wisdom should apply so while I understand the logic of beasts suggestion we did the compressor and just the compressor since we were certain it had a bad leak. A few things I picked up from the exercise.
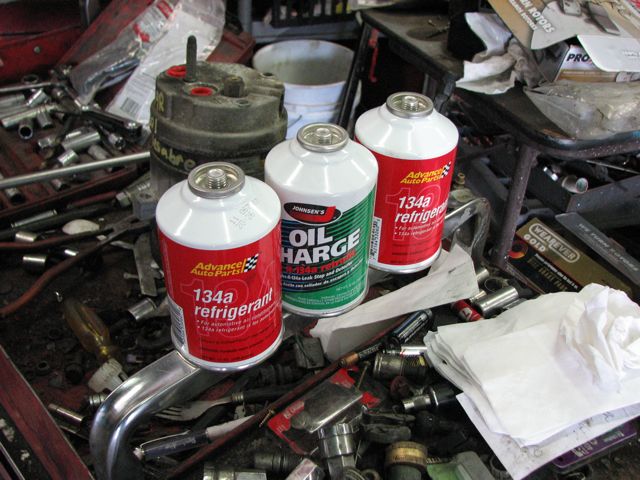
Out of the 3 cans of refrigerant the first to go in was the one with oil and dye. This does two things. The oil provides required lube for the new system which was vacuumed bone dry and may like the lube. It also means that if there is another leak, it will be easier to spot as a result of the green dye which was in the first can to fill in the system and spread around.
Passenger side wheel removed to provide access to everything. There is a panel in the way, easily also removed.
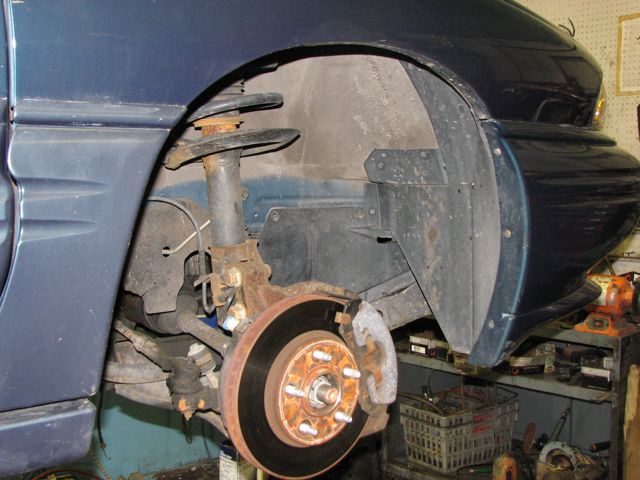
Removal of the side panel and there she is. I think there was another matching bolt above sheet metal on this side. I should note that the belt was removed before the car was lifted.
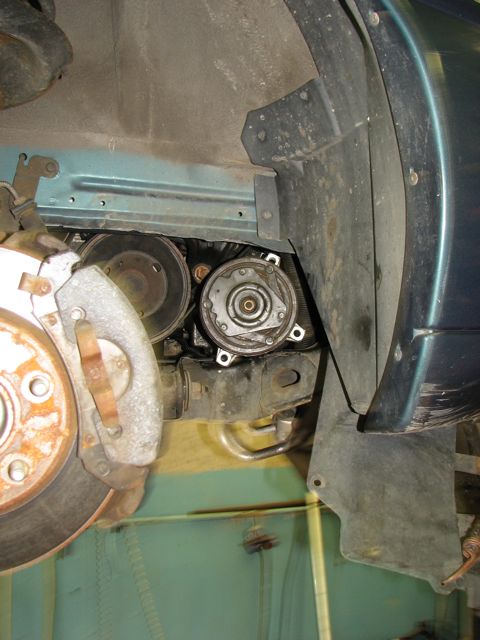
There is also a lower front valance cover which should be removed to access the compressor from the other side.
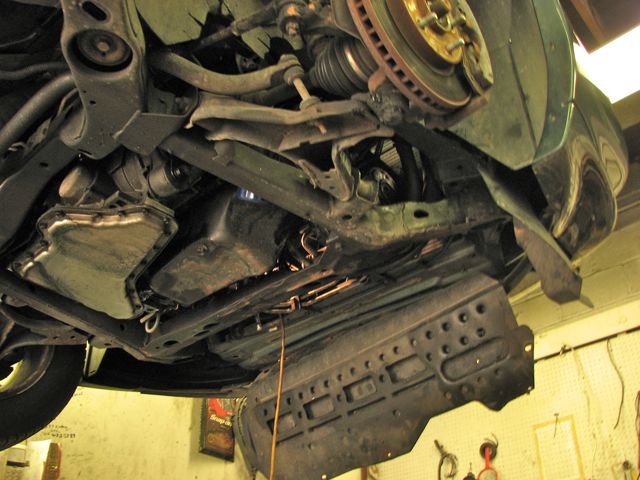
This last shot is a little harder to visualize but I was standing on the drivers side and it shows the other view looking up into the front of the engine compartment with that front lower shield removed. No easy access here of course until you've done it enough to get a feel for how it will slide out. There is also a ratchet handle in the middle of the photo, not part of the car. Pete was getting annoyed at my flash because he kept thinking that his shop light was blowing the lamp. When I had to decide between cool AC and good photos for the group, well, sorry guys. But this does at least show where it is and to some degree what the process involved (in addition to the notes above about making sure there is a vacuum in the system and that it sits long enough to remove any water that might get in there.

I would have preferred to photo dialog more of a step by step and complete procedure but maybe this will help someone at some point know what to expect when they need to replace the compressor if they haven't been in there yet. Have fun.
My friend whom the mech. works for is a used car guy. In that biz, you fix only what needs to be fixed. My current "budget" suggests the same wisdom should apply so while I understand the logic of beasts suggestion we did the compressor and just the compressor since we were certain it had a bad leak. A few things I picked up from the exercise.
Out of the 3 cans of refrigerant the first to go in was the one with oil and dye. This does two things. The oil provides required lube for the new system which was vacuumed bone dry and may like the lube. It also means that if there is another leak, it will be easier to spot as a result of the green dye which was in the first can to fill in the system and spread around.
Passenger side wheel removed to provide access to everything. There is a panel in the way, easily also removed.
Removal of the side panel and there she is. I think there was another matching bolt above sheet metal on this side. I should note that the belt was removed before the car was lifted.
There is also a lower front valance cover which should be removed to access the compressor from the other side.
This last shot is a little harder to visualize but I was standing on the drivers side and it shows the other view looking up into the front of the engine compartment with that front lower shield removed. No easy access here of course until you've done it enough to get a feel for how it will slide out. There is also a ratchet handle in the middle of the photo, not part of the car. Pete was getting annoyed at my flash because he kept thinking that his shop light was blowing the lamp. When I had to decide between cool AC and good photos for the group, well, sorry guys. But this does at least show where it is and to some degree what the process involved (in addition to the notes above about making sure there is a vacuum in the system and that it sits long enough to remove any water that might get in there.
I would have preferred to photo dialog more of a step by step and complete procedure but maybe this will help someone at some point know what to expect when they need to replace the compressor if they haven't been in there yet. Have fun.
'97 SSEi, Majestic Teal / Beige interior, Bose, HUD, iPod ready! - SOLD!
'99 Buick Regal LSE, Matador Red / Beige interior - SOLD! Check it out!
'96 Chevy Camaro - White w/Black / fire red interior, 3800, manual, loaded, T-tops, Bose - SOLD! Check it out!
-
Ingo0123
- SE Member

- Posts: 13
- Joined: Wed May 18, 2011 9:54 am
- Year and Trim: 1995 Pontiac Bonneville SSEi
Re: AC Compressor replacement techniques
I'm halfway through replacing my compressor on my '95 SSEi as well. Unfortunately I didn't find this post until after I had it pulled. So I'm staring at the new compressor and the pag 150 oil sitting next to it. The pag oil is not in line, its just normal unscrew the top and dump it in. I was told from autozone that I needed 8 ounces into the compressor before I hooked it up into the system. At any rate, I have no clue where to ad the oil at or if 8 oz is correct. I found some forum earlier that said where to ad and all that, but I can't locate it... I remember something about dumping the oil thats in the compressor, measuring it and adding it back in, but I don't know where to ad... Also, I unscrewd the center lug on the back of the compressor and lost some kind of pressure out of it, and I imagine thats 134a but I don't know. I'm trying to save as much as I can right now because money is tight and the Texas sun is hot. Any help would be appreciated. I'm going to a shop monday to get the system evacuated and I have the 134 to charge it with. I know about cleaning the condesnor, but I don't have a system to flush it with, so any ideas on flushing it for cheap?
Also, I know its the compressor because we put dye in and a week later the compressor was glowing under black light.
Also, I know its the compressor because we put dye in and a week later the compressor was glowing under black light.
Last edited by Ingo0123 on Sat Jul 09, 2011 7:03 pm, edited 1 time in total.
-
jonnevilleSSEi
- GXP Member
- Posts: 278
- Joined: Sat Dec 11, 2010 9:09 pm
- Year and Trim: '97 SSEi
- Location: Newtown Square, PA
- Contact:
Re: AC Compressor replacement techniques
When mine was done (and consider me an observer who knows very little, anyone else wants to pipe in, please do) "Pete" evacuated the system and gave it time to dry then added in first the one can of 134 WITH oil and dye, then the two cans of pure 134. It blew cold for a month but then suddenly over the course of 3 days went from cold to lukewarm to barely anything.
I thought there might be other problems but when I took it back to pete he just indicated that the pressure seemed low and "maybe 3 cans wasn't enough" because we saw no clear indication of a leak. He added two more cans of 134 and since then, cold as ice. I'll be away from the car for a while so I only hope it stays cold while I'm gone or the wifey may not follow through on making sure it gets the weekly drive she'd promised. Bottom line is that you must dry it out well (evacuate) and make sure you get that pressure up where it needs to be, prepare to use four cans. Also in mine there was no separate lubricant added, it was in the can with the refrigerant. Good luck.
I thought there might be other problems but when I took it back to pete he just indicated that the pressure seemed low and "maybe 3 cans wasn't enough" because we saw no clear indication of a leak. He added two more cans of 134 and since then, cold as ice. I'll be away from the car for a while so I only hope it stays cold while I'm gone or the wifey may not follow through on making sure it gets the weekly drive she'd promised. Bottom line is that you must dry it out well (evacuate) and make sure you get that pressure up where it needs to be, prepare to use four cans. Also in mine there was no separate lubricant added, it was in the can with the refrigerant. Good luck.
'97 SSEi, Majestic Teal / Beige interior, Bose, HUD, iPod ready! - SOLD!
'99 Buick Regal LSE, Matador Red / Beige interior - SOLD! Check it out!
'96 Chevy Camaro - White w/Black / fire red interior, 3800, manual, loaded, T-tops, Bose - SOLD! Check it out!
-
Ingo0123
- SE Member
- Posts: 13
- Joined: Wed May 18, 2011 9:54 am
- Year and Trim: 1995 Pontiac Bonneville SSEi
Re: AC Compressor replacement techniques
Got it all finished, going to either rent a vacuum pump tomorrow or take it to the shop and have them do it. Either way, the install was a lot easier than everyone thinks. Here are the tools you need if you want to do it yourself on your 92-99;
3/8" driver
15mm socket/box end
14mm socket
13mm socket
8mm socket
1 1/2" adjustable wrench
retaining ring pliers
2"-5" extension
A/C Vacuum pump (you can rent it at autozone for $40, or take it to a local shop)
Gauges
Remanfactured Compressor est ~$200 @ Autozone
O-ring kit est ~$10
I had to buy the high pressure cut off switch for the back of the compressor since the new one didn't come with it and I broke the old one. That was $20
150 PAG oil, I'd just get inline if you are only replacing the compressor. ~$15
I don't know how many cans of 134a I will need, but I image 2-3. They are about $15 here in Texas.
I've never attempted this before and the entire project took around 2 hours wrench time by myself. The rest was trying to figure things out talking to mechanics and dealing with autozone.
It really is fairly easy to do. I was super tight on cash so I didn't replace the condenser or accumulator. Just check your orifice to make sure there isn't anything clogging it up.
One last thing, my mechanic friend whos been doing this for 30 years told me to only ad a few ounces of oil to the new compressor. He said most of the oil was still in the system. I believe him since he just worked on the car not three weeks ago. Anyway, to ad the liquid oil remove the plate on the back of the compressor and just dump it into the bigger more open hole.
-
1oldman
- Certified Bonneville Nut
- Posts: 3975
- Joined: Tue May 04, 2010 11:21 pm
- Year and Trim: 2017 Hyundai Santa Fe Sport
- Location: Lone Star State
Re: AC Compressor replacement techniques
Ingo0123 wrote:I'm halfway through replacing my compressor on my '95 SSEi as well. Unfortunately I didn't find this post until after I had it pulled. So I'm staring at the new compressor and the pag 150 oil sitting next to it. The pag oil is not in line, its just normal unscrew the top and dump it in. I was told from autozone that I needed 8 ounces into the compressor before I hooked it up into the system. At any rate, I have no clue where to ad the oil at or if 8 oz is correct. I found some forum earlier that said where to ad and all that, but I can't locate it... I remember something about dumping the oil thats in the compressor, measuring it and adding it back in, but I don't know where to ad... Also, I unscrewd the center lug on the back of the compressor and lost some kind of pressure out of it, and I imagine thats 134a but I don't know. I'm trying to save as much as I can right now because money is tight and the Texas sun is hot. Any help would be appreciated. I'm going to a shop monday to get the system evacuated and I have the 134 to charge it with. I know about cleaning the condesnor, but I don't have a system to flush it with, so any ideas on flushing it for cheap?
Also, I know its the compressor because we put dye in and a week later the compressor was glowing under black light.
O'Reilly and NAPA sell cans of compressed flush in an aerosol can. That and compressed air is what we use. The can to flush, the compressed air to blow out the flush. Use it to back-flush, not forward flush.
What part of the world in Texas do you live? Spring? - BC
In Memory of Brad - 1/21/1977 .. 10/23/2013 ...... Aaron - 1977 .. 2017 .....
2017 Hyundai Santa Fe Sport ..... 1992 Bonneville SSE 1SB 170 HP L27 4T60E retired/sold to MattStrike ..... 2005 Bonneville SE 1SC 205 HP L36 4T65E - retired/salvage yard ..... PBCF user 2321
2017 Hyundai Santa Fe Sport ..... 1992 Bonneville SSE 1SB 170 HP L27 4T60E retired/sold to MattStrike ..... 2005 Bonneville SE 1SC 205 HP L36 4T65E - retired/salvage yard ..... PBCF user 2321