

If I remove my rear bumper, do I have to worry about the air bags going off, or should I just disconnect the battery to be on the safe side?
reason being, I recently purchased a trunk mount bike rack and used it with 2 bikes on it all weekend. When I removed the bike rack I noticed the flat plate on the bumper where the trunk lid sits is now rounded due to the weight, so I'm hoping to put a brace under it so it won't get disconfigured from the weight. I noticed there is nothing under that panel when I put my fingers up through the license plate light hole, except for the plastic that makes the panel.
Rear Bumper removal
-
Night Crawler

- Posts like an L36

- Posts: 827
- Joined: Thu May 22, 2008 12:32 am
- Year and Trim: 2002 Bonneville SE
- Location: Winnipeg, MB, Can (actually near Starbuck)
Rear Bumper removal
FWI, converted low beam bulbs into high beam bulbs, 20% tint all around, MSD wires, NDK TR55 plugs, auxiliary line in, scan gauge, custom FloPro/MagnaFlow Cat back exhaust
2002 Bonneville SE
-
Night Crawler
- Posts like an L36
- Posts: 827
- Joined: Thu May 22, 2008 12:32 am
- Year and Trim: 2002 Bonneville SE
- Location: Winnipeg, MB, Can (actually near Starbuck)
Re: Rear Bumper removal
bump
FWI, converted low beam bulbs into high beam bulbs, 20% tint all around, MSD wires, NDK TR55 plugs, auxiliary line in, scan gauge, custom FloPro/MagnaFlow Cat back exhaust
2002 Bonneville SE
-
harofreak00

- Administrator

- Posts: 26022
- Joined: Mon May 19, 2008 6:04 pm
- Year and Trim: 2004 GXP - plus a handful of other Bonnevilles
- Location: Browerville, MN
- Contact:
Re: Rear Bumper removal
Removal:
Raise and support the vehicle. Refer to Lifting and Jacking the Vehicle in General Information.
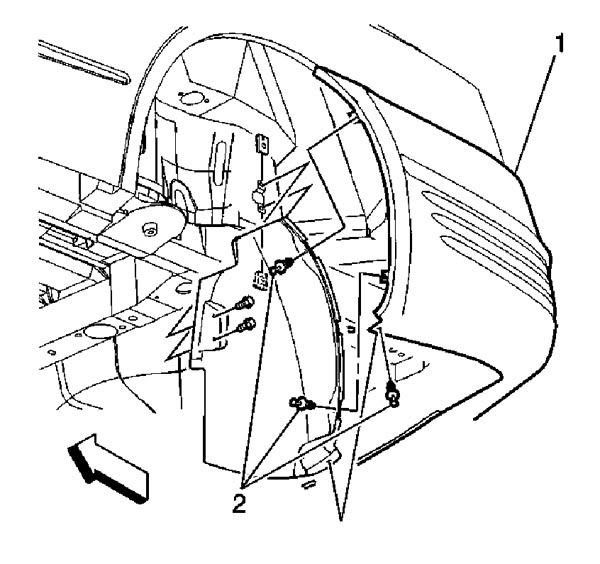
Remove the push pin retainers (2) that secure the rear bumper fascia to the rear wheelhouse extensions.
Remove the fastener (5) securing the rear bumper fascia at the wheelhouse opening.
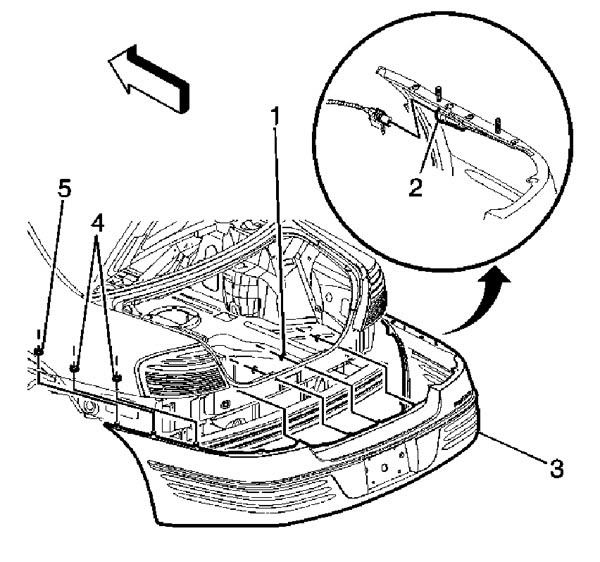
Disconnect the license lamp electrical connector (2).
Open the rear compartment lid.
Remove the rear compartment sill trim. Refer to Compartment Sill Plate Replacement - Rear in Body Rear End.
Fold back the rear compartment side trim panels. Refer to Compartment Trim Panel Replacement - Rear in Body Rear End.
Remove the fasteners (4) securing the rear bumper fascia (3) to the quarter panels.
Remove the fasteners (1) securing the rear bumper fascia (3) to the rear end panel.
Remove the rear bumper fascia (3) from the vehicle.
Remove the energy absorber from the fascia. Refer to Energy Absorber Replacement - Rear .
Installation:
Install the energy absorber to the fascia. Refer to Energy Absorber Replacement - Rear .
Align the fasteners (1, 4, 5) in the rear bumper fascia (3) to the body.
Connect the license lamp wire connector (2).
Important
The butyl washers on the fasteners (1,4,5) must be replaced upon reassembly. This will ensure that exhaust gases do not enter the passenger compartment.
Install new butyl washers onto the fascia studs.
Notice
Use the correct fastener in the correct location. Replacement fasteners must be the correct part number for that application. Fasteners requiring replacement or fasteners requiring the use of thread locking compound or sealant are identified in the service procedure. Do not use paints, lubricants, or corrosion inhibitors on fasteners or fastener joint surfaces unless specified. These coatings affect fastener torque and joint clamping force and may damage the fastener. Use the correct tightening sequence and specifications when installing fasteners in order to avoid damage to parts and systems.
Install the fasteners (4, 5) to secure the rear bumper fascia (1) to the quarter panels. Tighten
Tighten the fasteners to 6 N·m (53 lb in).
Install the fasteners (1) to secure the rear bumper fascia to the rear end panel. Tighten
Tighten the fasteners to 6 N·m (53 lb in).
Install the rear compartment side trim panels. Refer to Compartment Trim Panel Replacement - Rear in Body Rear End.
Install the rear compartment sill trim. Refer to Compartment Sill Plate Replacement - Rear in Body Rear End.
Close the rear compartment lid.
Install the push pin retainers (2) to secure the rear bumper fascia to the rear wheelhouse extensions.
Lower the vehicle.
Raise and support the vehicle. Refer to Lifting and Jacking the Vehicle in General Information.
Remove the push pin retainers (2) that secure the rear bumper fascia to the rear wheelhouse extensions.
Remove the fastener (5) securing the rear bumper fascia at the wheelhouse opening.
Disconnect the license lamp electrical connector (2).
Open the rear compartment lid.
Remove the rear compartment sill trim. Refer to Compartment Sill Plate Replacement - Rear in Body Rear End.
Fold back the rear compartment side trim panels. Refer to Compartment Trim Panel Replacement - Rear in Body Rear End.
Remove the fasteners (4) securing the rear bumper fascia (3) to the quarter panels.
Remove the fasteners (1) securing the rear bumper fascia (3) to the rear end panel.
Remove the rear bumper fascia (3) from the vehicle.
Remove the energy absorber from the fascia. Refer to Energy Absorber Replacement - Rear .
Installation:
Install the energy absorber to the fascia. Refer to Energy Absorber Replacement - Rear .
Align the fasteners (1, 4, 5) in the rear bumper fascia (3) to the body.
Connect the license lamp wire connector (2).
Important
The butyl washers on the fasteners (1,4,5) must be replaced upon reassembly. This will ensure that exhaust gases do not enter the passenger compartment.
Install new butyl washers onto the fascia studs.
Notice
Use the correct fastener in the correct location. Replacement fasteners must be the correct part number for that application. Fasteners requiring replacement or fasteners requiring the use of thread locking compound or sealant are identified in the service procedure. Do not use paints, lubricants, or corrosion inhibitors on fasteners or fastener joint surfaces unless specified. These coatings affect fastener torque and joint clamping force and may damage the fastener. Use the correct tightening sequence and specifications when installing fasteners in order to avoid damage to parts and systems.
Install the fasteners (4, 5) to secure the rear bumper fascia (1) to the quarter panels. Tighten
Tighten the fasteners to 6 N·m (53 lb in).
Install the fasteners (1) to secure the rear bumper fascia to the rear end panel. Tighten
Tighten the fasteners to 6 N·m (53 lb in).
Install the rear compartment side trim panels. Refer to Compartment Trim Panel Replacement - Rear in Body Rear End.
Install the rear compartment sill trim. Refer to Compartment Sill Plate Replacement - Rear in Body Rear End.
Close the rear compartment lid.
Install the push pin retainers (2) to secure the rear bumper fascia to the rear wheelhouse extensions.
Lower the vehicle.
Andrew - owner/operator of Bonnevilles Unlimited

2004 Bonneville GXP | 60k | White Gold Tricoat | custom built supercharged 3800 hot rod | garage queen
1997 Corvette | 57k | Silver Metallic | Z06 wheels | Date-night Hauler/Parts runner
2014 Town & Country Limited | Cashmere Pearl | 115k | Family Hauler
2002 Ram 1500 Quad Cab Sport | Black| 280k | Official Bonneville Hauler
-
Night Crawler
- Posts like an L36
- Posts: 827
- Joined: Thu May 22, 2008 12:32 am
- Year and Trim: 2002 Bonneville SE
- Location: Winnipeg, MB, Can (actually near Starbuck)
Re: Rear Bumper removal
thanks, so I don't have to worry about the airbags going off then?
FWI, converted low beam bulbs into high beam bulbs, 20% tint all around, MSD wires, NDK TR55 plugs, auxiliary line in, scan gauge, custom FloPro/MagnaFlow Cat back exhaust
2002 Bonneville SE
-
harofreak00
- Administrator
- Posts: 26022
- Joined: Mon May 19, 2008 6:04 pm
- Year and Trim: 2004 GXP - plus a handful of other Bonnevilles
- Location: Browerville, MN
- Contact:
Re: Rear Bumper removal
Nope.
Andrew - owner/operator of Bonnevilles Unlimited
2004 Bonneville GXP | 60k | White Gold Tricoat | custom built supercharged 3800 hot rod | garage queen
1997 Corvette | 57k | Silver Metallic | Z06 wheels | Date-night Hauler/Parts runner
2014 Town & Country Limited | Cashmere Pearl | 115k | Family Hauler
2002 Ram 1500 Quad Cab Sport | Black| 280k | Official Bonneville Hauler
-
Night Crawler
- Posts like an L36
- Posts: 827
- Joined: Thu May 22, 2008 12:32 am
- Year and Trim: 2002 Bonneville SE
- Location: Winnipeg, MB, Can (actually near Starbuck)
Re: Rear Bumper removal
ok, well i did i minor fix to get the indentation out. I left my rear bumper facing the afternoon sun for the last week and it has formed itself almost completely out.
FWI, converted low beam bulbs into high beam bulbs, 20% tint all around, MSD wires, NDK TR55 plugs, auxiliary line in, scan gauge, custom FloPro/MagnaFlow Cat back exhaust
2002 Bonneville SE
-
00Beast
- Retired Site Developer

- Posts: 20960
- Joined: Tue May 27, 2008 10:30 pm
- Year and Trim: '17 Silverado 1500
- Location: MN/IA
- Contact:
Re: Rear Bumper removal
The sun has power!!
Bye Bye:

RIP sandrock
RIP sandrock
Sirius wrote:Think about it. You’re tooling down the road in your Prius, knowing full-well that this thing being green is as big a sham as federally mandated ethanol-enriched gas, Russia pulling out of Ukraine, and Obamacare.
-
zuluhead
- SSEi Member

- Posts: 197
- Joined: Thu May 29, 2008 9:53 am
- Year and Trim: 2000 SSEi
- Location: Saint Charles, MO
- Contact:
Re: Rear Bumper removal
[singing] The sun is a mass of incandescent gas, a gigantic nuclear furnace, where hydrogen is built into helium at a temperature of million of degrees.[/singing]00Beast wrote:The sun has power!!
2000 Bonneville - SSEI
-
Night Crawler
- Posts like an L36
- Posts: 827
- Joined: Thu May 22, 2008 12:32 am
- Year and Trim: 2002 Bonneville SE
- Location: Winnipeg, MB, Can (actually near Starbuck)
Re: Rear Bumper removal
FWI, converted low beam bulbs into high beam bulbs, 20% tint all around, MSD wires, NDK TR55 plugs, auxiliary line in, scan gauge, custom FloPro/MagnaFlow Cat back exhaust
2002 Bonneville SE

-
zuluhead
- SSEi Member
- Posts: 197
- Joined: Thu May 29, 2008 9:53 am
- Year and Trim: 2000 SSEi
- Location: Saint Charles, MO
- Contact:
Re: Rear Bumper removal
it's the first line of a fun little ditty called 'Why Does The Sun Shine' by the group They Might Be Giants.TenGHz wrote:x2 - lmaoNight Crawler wrote:
for your convenience: http://www.seeqpod.com/search/?plid=842e4ce456
2000 Bonneville - SSEI
-
Night Crawler
- Posts like an L36
- Posts: 827
- Joined: Thu May 22, 2008 12:32 am
- Year and Trim: 2002 Bonneville SE
- Location: Winnipeg, MB, Can (actually near Starbuck)
Re: Rear Bumper removal
FWI, converted low beam bulbs into high beam bulbs, 20% tint all around, MSD wires, NDK TR55 plugs, auxiliary line in, scan gauge, custom FloPro/MagnaFlow Cat back exhaust
2002 Bonneville SE
-
gonzo4191

- Certified Bonneville Nut

- Posts: 2616
- Joined: Wed May 21, 2008 9:52 pm
- Year and Trim: 91 S10 P/U
97 SSEI- 136k - Location: round lake beach, IL
- Contact:
Re: Rear Bumper removal
i know "They might be giants"!!zuluhead wrote:it's the first line of a fun little ditty called 'Why Does The Sun Shine' by the group They Might Be Giants.TenGHz wrote:x2 - lmaoNight Crawler wrote:
for your convenience: http://www.seeqpod.com/search/?plid=842e4ce456
-Juan
No bonnie!
93 s10 ex cab: 2.8: t5: exhaust: tbi mods. 5.3, 76mm, and a D.r cam on a stand
No bonnie!
93 s10 ex cab: 2.8: t5: exhaust: tbi mods. 5.3, 76mm, and a D.r cam on a stand
-
Ishkabod
- LE Member
- Posts: 5
- Joined: Fri Jun 30, 2017 12:07 pm
- Year and Trim: 2000 Pontiac Bonniville SE?
Re: Rear Bumper removal
This is exactly what I need to do but it's kinda hard to understand without the visual cues. Is there somewhere I can find a description like this with a visual map of what is where and how to do it?