

Fixing a Rust Hole (Patched on 1/18/09!)
-
Archon

- Resident Gearhead

- Posts: 8781
- Joined: Mon May 19, 2008 10:30 pm
- Year and Trim: 2014 Cadillac XTS Vsport.
- Location: Grand Rapids, Michigan
Re: Fixing a Rust Hole (Pictures Included)
What I used several years ago on a '93 SSE that developed that problem was pieces of roofing flashing. Easy to work with, and doesn't rust. It lasted at least a couple of years.
*Gone, but not forgotten* - Black 2000 SSEi, HIR Headlights, Angel Eyes fogs, 3rd brake light overlay, hi-flo cat, 180 degree thermostat, HS 1.9 rockers, LSx yellow springs, Intense FWI, PCM, shift kit, push rods, and 3.4 Pulley. ZZP Power Log.
-
LeSabre in Buffalo
- Certified Bonneville Nut

- Posts: 3177
- Joined: Fri May 23, 2008 1:15 am
- Year and Trim: 2012 Eco
- Location: Corning, NY
Re: Fixing a Rust Hole (Pictures Included)
Bought the 22 gauge steel sheet, 3mm wide by 4mm long steel rivets, rivet gun, wire wheel, JB Weld and scraper today. Already have undercoating, but thinking of picking up some Rustoleum or similar coating to put on before applying the undercoating. POR sounds nice, but is a bit too pricey at the moment for the amount I'd use.
Archon, I looked at the roofing flashing in the little squares, and it looked like glorified tinfoil. Easy to work with, yes, but it looks like a good rainstorm would rust through it.
Archon, I looked at the roofing flashing in the little squares, and it looked like glorified tinfoil. Easy to work with, yes, but it looks like a good rainstorm would rust through it.
2012 Chevrolet Cruze Eco - Current car


1999 Buick LeSabre Custom - Former car
Learn from the mistakes of others, that way when you mess up you can do so in new and interesting ways.
1999 Buick LeSabre Custom - Former car
Learn from the mistakes of others, that way when you mess up you can do so in new and interesting ways.
-
Skippy1827
- Posts like an L36

- Posts: 847
- Joined: Thu May 22, 2008 10:31 am
- Year and Trim: 2015 Cadillac XTS
- Location: Waukesha, Wisconsin
Re: Fixing a Rust Hole (Pictures Included)
"Long lasting temporary fix"Toddster wrote:grab a license plate off of one of the junkers. the plate will work fine and it's galvanized making it great for a longer lasting temporary fix.
I find that funny somehow.

Steve
Was - 1998 SSEi - 128,000 mi. ---- SOLD----
Was - 2003 Cadillac DeVille DTS - 91,000 mi. ----SOLD----
Was - 2008 Cadillac STS ---SOLD---
Is - 2015 Cadillac XTS AWD Luxury, Black/Black.
2019 Toyota Camry XSE, - Supersonic Red - Black leather int.
2005 Buick Lacrosse CXL, Silver - Black leather Int.
-
Archon
- Resident Gearhead
- Posts: 8781
- Joined: Mon May 19, 2008 10:30 pm
- Year and Trim: 2014 Cadillac XTS Vsport.
- Location: Grand Rapids, Michigan
Re: Fixing a Rust Hole (Pictures Included)
Sorry, I should have been a bit more specific. You may have been looking at some step flashing for shingles that is a bit thinner. The stuff I used comes in a roll. Too late now, but another option would be to use sheets of heating duct material that can be found at some hardware stores.
*Gone, but not forgotten* - Black 2000 SSEi, HIR Headlights, Angel Eyes fogs, 3rd brake light overlay, hi-flo cat, 180 degree thermostat, HS 1.9 rockers, LSx yellow springs, Intense FWI, PCM, shift kit, push rods, and 3.4 Pulley. ZZP Power Log.
-
LeSabre in Buffalo
- Certified Bonneville Nut
- Posts: 3177
- Joined: Fri May 23, 2008 1:15 am
- Year and Trim: 2012 Eco
- Location: Corning, NY
Re: Fixing a Rust Hole (Pictures Included)
More pictures of the carnage after a bit of scraping.
The whole thing from underneath, including areas that were not touched by the rust converter, and areas that chipped away really easily after conversion.

Where the hole is in the frame. That big, thick sheet looks kinda structural...Note the rubber grommet holding the wiring harness on the upper part of the photo for future reference.

And an image from the back to show where in relation to the strut tower the hole is. Note the rubber grommet for the wiring in both pictures.

I'm still planning on riveting a steel sheet and JB Weld sandwich over the hole itself and simply converting the rest of the area after wire-brushing the loose rust off, then topping the entire area with primer and undercoating.
Since that thick steel sheet in the photos looks sort of structural, I'm not planning on having a lot of rivet holes in there, and working as close to the front of that sheet as I can. That will likely be an inch or so back to have enough room to work, yet still have enough overlap to reinforce the area.
The whole thing from underneath, including areas that were not touched by the rust converter, and areas that chipped away really easily after conversion.
Where the hole is in the frame. That big, thick sheet looks kinda structural...Note the rubber grommet holding the wiring harness on the upper part of the photo for future reference.
And an image from the back to show where in relation to the strut tower the hole is. Note the rubber grommet for the wiring in both pictures.
I'm still planning on riveting a steel sheet and JB Weld sandwich over the hole itself and simply converting the rest of the area after wire-brushing the loose rust off, then topping the entire area with primer and undercoating.
Since that thick steel sheet in the photos looks sort of structural, I'm not planning on having a lot of rivet holes in there, and working as close to the front of that sheet as I can. That will likely be an inch or so back to have enough room to work, yet still have enough overlap to reinforce the area.
2012 Chevrolet Cruze Eco - Current car
1999 Buick LeSabre Custom - Former car
Learn from the mistakes of others, that way when you mess up you can do so in new and interesting ways.
1999 Buick LeSabre Custom - Former car
Learn from the mistakes of others, that way when you mess up you can do so in new and interesting ways.
-
LeSabre in Buffalo
- Certified Bonneville Nut
- Posts: 3177
- Joined: Fri May 23, 2008 1:15 am
- Year and Trim: 2012 Eco
- Location: Corning, NY
Re: Fixing a Rust Hole (Now More Pictures!!!)
A patch is in!
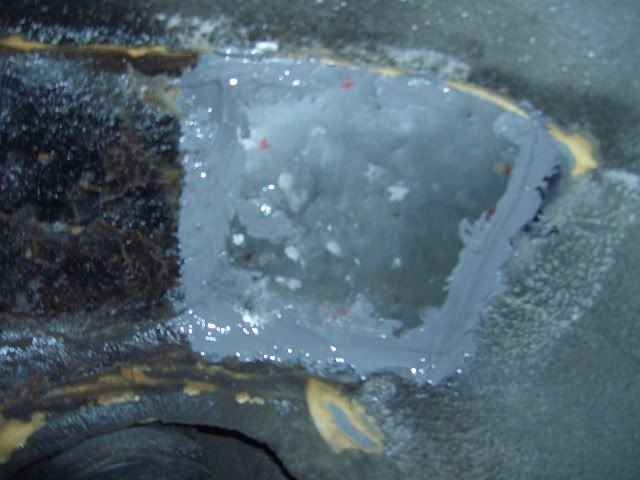
Now to let the JB Weld cure around the hole (har, har, it's 32* F and 100% humidity right now and it's covered in Saran Wrap so I could drive back from my friend's house).
Next steps are to smooth out the JB, throw a few coats of Rustoleum over top of the whole mess, and then a coating of undercoating! The end is in sight...
2012 Chevrolet Cruze Eco - Current car
1999 Buick LeSabre Custom - Former car
Learn from the mistakes of others, that way when you mess up you can do so in new and interesting ways.
1999 Buick LeSabre Custom - Former car
Learn from the mistakes of others, that way when you mess up you can do so in new and interesting ways.
-
tripscarcare95
- Posts like a Northstar

- Posts: 1730
- Joined: Fri May 23, 2008 2:54 am
- Year and Trim: 1995 SSei
1987 GN 16K Original
Re: Fixing a Rust Hole (Patched on 1/18/09!)
I had the same situation happen on my 95 in the pass rear wheel well, I ended up cutting out the rust hole and welding a patch in place, then resealing it with seam sealer and por 15d the whole area on both sides,
Looks like your fix will last a while,are you going to under coat the patch on the inside of the wheel well??
Looks like your fix will last a while,are you going to under coat the patch on the inside of the wheel well??
-
LeSabre in Buffalo
- Certified Bonneville Nut
- Posts: 3177
- Joined: Fri May 23, 2008 1:15 am
- Year and Trim: 2012 Eco
- Location: Corning, NY
Re: Fixing a Rust Hole (Patched on 1/18/09!)
Yep!
2012 Chevrolet Cruze Eco - Current car
1999 Buick LeSabre Custom - Former car
Learn from the mistakes of others, that way when you mess up you can do so in new and interesting ways.
1999 Buick LeSabre Custom - Former car
Learn from the mistakes of others, that way when you mess up you can do so in new and interesting ways.
-
willwren

- Retired Admin

- Posts: 65489
- Joined: Sun May 18, 2008 11:07 pm
- Year and Trim: .
93 SSEi
95 SLE (SC)
97 Buick LeSabre - Location: Oregon WCBF'04, '05, '06, '07, '08, '09, '10, '11 Survivor
- Contact:
Re: Fixing a Rust Hole (Patched on 1/18/09!)
Forget the rustoleum, it won't stick. Go right to the rubber. Inside the trunk, too.

Click here for mod list for both cars
93 SSEi, 95 SLE (supercharged) 97 Buick LeSabre Limited
PontiacDad at WCBF '04: Cruise control? That's like surrendering!
Comprehensive guide to troubleshooting, rebuilding, and modifying Eaton Superchargers
-
LeSabre in Buffalo
- Certified Bonneville Nut
- Posts: 3177
- Joined: Fri May 23, 2008 1:15 am
- Year and Trim: 2012 Eco
- Location: Corning, NY
Re: Fixing a Rust Hole (Patched on 1/18/09!)
Okay. That's easy enough!
2012 Chevrolet Cruze Eco - Current car
1999 Buick LeSabre Custom - Former car
Learn from the mistakes of others, that way when you mess up you can do so in new and interesting ways.
1999 Buick LeSabre Custom - Former car
Learn from the mistakes of others, that way when you mess up you can do so in new and interesting ways.
-
Boreas

- Posts like an L36
- Posts: 1101
- Joined: Fri May 23, 2008 4:27 pm
- Year and Trim: 1993 SE
1996 SSEi
1997 SSEi 40th - Location: Chi-Town
- Contact:
Re: Fixing a Rust Hole (Patched on 1/18/09!)
I have the same thing on my 93 SE and now my 96 SSEi, which is worse. I have it temporarily sealed up and oiled the rust to slow it down. Looking to take it in to the shop soon to get it taken care of.
1993 Bonneville SE "Old Ironsides" 244,xxx - Junked.
1996 Bonneville SSEi "Double Trouble" 164,xxx - Stock
1997 Bonneville SSEi 40th "Purple Spaceship" 204,xxx - Aeroforce Interceptor, B&M 70264 Trans Cooler, Intense FWI, High-Flow Feline, non-Bose head unit w/ 5 band, Alpine 6x9's, 3.5 MPS, SD Headers, rear disc brake conversion. Future: 1.9 Rockers
1997 Buick Park Avenue "Blue Floaty Thing" 124,000 - Daily Driver/Winter Beater
-
LeSabre in Buffalo
- Certified Bonneville Nut
- Posts: 3177
- Joined: Fri May 23, 2008 1:15 am
- Year and Trim: 2012 Eco
- Location: Corning, NY
Re: Fixing a Rust Hole (Patched on 1/18/09!)
I took care of this over a few weeks for about $120, including buying tools. It's now coated with rubberized undercoating. Another few coats wouldn't hurt, though. Ran out coating the rear wheel wells and the backseat. Amazing for sound reduction.
Here's one approach to fixing it that works. Other approaches will work also.
Here's one approach to fixing it that works. Other approaches will work also.
2012 Chevrolet Cruze Eco - Current car
1999 Buick LeSabre Custom - Former car
Learn from the mistakes of others, that way when you mess up you can do so in new and interesting ways.
1999 Buick LeSabre Custom - Former car
Learn from the mistakes of others, that way when you mess up you can do so in new and interesting ways.
-
LeSabre in Buffalo
- Certified Bonneville Nut
- Posts: 3177
- Joined: Fri May 23, 2008 1:15 am
- Year and Trim: 2012 Eco
- Location: Corning, NY
Re: Fixing a Rust Hole (Patched on 1/18/09!)
Yesterday I took out the seats and carpet to dry out the sodden sound insulation underneath the carpet. It's basically carpet padding, so it holds water exceptionally well. Drained off the standing water, dried the insulation overnight, then threw everything back in.
The air bag module was a casualty, so a used one out of a 98 Bonneville was ordered. From my reading of the FSM's it should plug and play without needing reprogramming. I'll see.
And discovered another small hole in the interior, so it got coated with undercoating inside the cabin and underneath the car since it's not repairable by non-surgical means. At least this will keep water from entering.
This car's days are numbered. Might be a large number, but they still are finite. No more mods, just keeping it going.
2012 Chevrolet Cruze Eco - Current car
1999 Buick LeSabre Custom - Former car
Learn from the mistakes of others, that way when you mess up you can do so in new and interesting ways.
1999 Buick LeSabre Custom - Former car
Learn from the mistakes of others, that way when you mess up you can do so in new and interesting ways.
-
klindstedt
- SE Member

- Posts: 24
- Joined: Sat Mar 14, 2009 1:08 pm
- Year and Trim: 1993 Buick LeSabre Limited
- Location: Chesterton, Indiana
Re: Fixing a Rust Hole (Patched on 1/18/09!)
I just performed a similar repair on my LeSabre this weekend. However, I used fiberglass instead. I had the same rustout in front of that structural-looking piece, but also a larger hole behind it in the trunk. After removing the seat and all the trunk trim I sanded/wire-brushed to remove as much rust as possible. Then I wiped everything down with some naptha to remove any old wax, grease, etc.. and then sprayed the rusted areas with some rusty metal primer.
This was my first time using fiberglass. The stuff on top was easy enough with gravity helping and all, but working on the underside of the wheelwell was quite an adventure. Let's just say it will be awhile before my arm no longer shows signs of my fiberglassing adventure. Lesson learned - use short small strips if working overhead as they will stick better. The end result, while not pretty, was solid, strong and waterproof. I finished it off with a couple of coats of truck bed liner.
While it was a messy job, I should have done this sooner instead of letting the trunk mat and interior carpet and pad get so wet and nasty. It took almost as long to dry everything out as it did to perform the repair. Sorry no pictures, I was so sticky with resin I wouldn't have wanted to touch the camera.
Last edited by klindstedt on Sun Mar 22, 2009 11:50 pm, edited 1 time in total.
-
LeSabre in Buffalo
- Certified Bonneville Nut
- Posts: 3177
- Joined: Fri May 23, 2008 1:15 am
- Year and Trim: 2012 Eco
- Location: Corning, NY
Re: Fixing a Rust Hole (Patched on 1/18/09!)
Good job!
As far as I can tell, the repair is water-tight and holding up. So it's looking good for a long-term fix.
As far as I can tell, the repair is water-tight and holding up. So it's looking good for a long-term fix.
2012 Chevrolet Cruze Eco - Current car
1999 Buick LeSabre Custom - Former car
Learn from the mistakes of others, that way when you mess up you can do so in new and interesting ways.
1999 Buick LeSabre Custom - Former car
Learn from the mistakes of others, that way when you mess up you can do so in new and interesting ways.