Page 1 of 3

How do I install a OEM 12 disc changer in my 02 SSEi?

Posted: Wed Apr 22, 2009 9:58 pm
by kts0347
I found a 12 disc cd changer removed from a 2001 Bonneville. My car is an 02 SSEi and the parts store says that it should be interchangeable. (I haven't bought it yet - pending responses I get to this post)

The item comes with the changer, mounting brackets and a pig tail lead (about 18 inches of wire with the connector to the changer).

My car has the stock GM Monsoon setup.

1) Will the '01 changer's brackets install into my trunk without cutting and fitting?

2) Will there be a wiring harness connector available in the trunk area that would permit install on plug and play basis? If not, what do I have to do to get the CD player up and running?

3) Does $105 sound like a good price?

Thanks for the help. I've followed some of the posts in this forum, and you guys are really knowledgable. Not like some forums (non-Pontiac Bonneville Club) where advice is abundant but uninformed. :bstooges:

(Seller's description: 12 disc changer removed from a 2001 Pontiac Bonneville. This changer is in good used condition, and includes the cartridge, mounting bracket, and pigtail wiring. Manufactured by Pioneer, part# 25708970, model# CDX-M1026ZG.)

Re: How do I install a OEM 12 disc changer in my 02 SSEi?

Posted: Wed Apr 22, 2009 10:29 pm
by ddalder
There are a few things you need to know...

1. The wiring will not be in place for you to add this unless your car previously had one and it was removed (unlikely).
2. It is possible, however you will need to add a wiring harness to your vehicle. I have built some of these for people in the past and therefore know it can be done.
3. You require the CDX, cartridge, bracket, harness and preferably the trim panel for the trunk. The one you currently have will need to be removed.
4. You would need some knowledge of wiring to do this. You will need to take your dash apart to some extent to install everything. The CDX mounts in the trunk. Preferably, you should be able to solder.
5. You will need a mounting stud (available from GM) and a couple of 10mm bolts w/washers.
6. This CDX is compatible with any 2000+ Bonneville, some Aurora's and LeSabres, however the bracket MUST be from a Bonneville.

Hope this helps :wink:

Re: How do I install a OEM 12 disc changer in my 02 SSEi?

Posted: Thu Apr 23, 2009 3:09 pm
by kts0347
Thanks for the comeback. I appreciate the information and help.

The CD player is from an 01 Bonneville, and includes the factory brackets to mount in the trunk. I "hope" that my 02 Bonneville SSEi structure is comparable, so the brackets will line up with some mounting positions. Does anyone have a diagram showing where this changer installs in the trunk? I've never seen one installed.

The player includes about 18 inches of the original wiring harness, including the connector to the player unit. Can you provide me of more details of the harness that I will have to construct to connect to the head unit?

Does my factory OEM head unit (Monsoon SSEi) have the controls necessary to operate the remote changer, or do I need something else to control the changer?

Thanks.

Keith

Re: How do I install a OEM 12 disc changer in my 02 SSEi?

Posted: Thu Apr 23, 2009 3:32 pm
by ddalder
If the bracket is from a Bonneville it will fit your car. The same CDX was used in a couple of different vehicles, but the bracket (at least for the Aurora) was a different shape because of the body style. It mounts just inside the trunk on the right hand side. The carpet trim however is a different shape to accomodate both the size of it along with the cutout for the mechanism.

Any 2000+ Bonneville head unit will control this CDX. No worries there. This was an option right from the start of this body style (in 2000). 1999 and earlier Bonneville's are entirely different electronics.

Your biggest problem is that you have a 2002+ style Bonneville. In 2000-01 the connection point into the dash is different and the electrical terminals for those two years are very plentiful. The terminals you require to connect into the 2002+ are extremely scarce and I'm currently trying to source some. They are a restricted use item (for GM) so when I talked with my Delphi distributor it wasn't going to be easy to get them. The terminals you need are for a "Dock-N-Lock" style connector. I was able to obtain a very limited number back when I installed the CDX into my 2002 Bonneville SE. The other option would be to contact a wrecker and see if they'll cut the radio connector out of the dash for you with 4 or 5 inches of wiring. It would have to be 2002+ or newer since the instrument panel wiring in 2000-01 was a flexible printed circuit. You could remove the terminals from the wrecker radio connector housing and splice the wires onto a new harness for insertion into your connector. If you are unable to obtain these terminals you WILL have significant problems installing this device.

The connector on this changer has 10 cavities, only 8 are used (7 connections + a bare drain wire for audio shielding).

Class 2 Serial Data (2 Connections)
Power
Ground
Left Audio
Right Audio
Audio Common

This changer is traditionally wired in series with the other Class 2 devices in the vehicle, hence why there are 2 connections for serial data. This is how the head unit communicates with the CDX. The only wires that actually must be routed to the dash are those for audio and the drain. I'll have to try and get diagrams.

Here is a picture of my 2004 GXP (identical installation as your car) only my trim is removed in this photo.

Image

Re: How do I install a OEM 12 disc changer in my 02 SSEi?

Posted: Thu Apr 23, 2009 5:14 pm
by kts0347
Hi again,

Thanks for the informative update. It was really helpful.

1) I have confirmed that the changer assemby has the identical brackets to that shown in your photo, so it should fit nicely into my 02 SSEi.

2) On the molded plastic part that covers your tail lights, it looks like there is a bump out to fit around one of the brackets. This must be a special molding for cars with the changer. Does it look like I can create a bump out in mine using a heat gun and some pressure? Or do I need to look for a new plastic molding?

3) I'll start canvassing the auto wreckers for a connection lead to the head unit. Is it separate from the normal connector to the head unit, or in replacement of that connector? (i.e. is there an unused receptacle on the head unit waiting for the CDX player plug?)

4) Re the carpet side panel, do you think I can modify mine by cutting an opening for the CDX player, or do I need to shop for one of these too?

5) I'll stand by for your comeback on the wiring. The pigtail lead that comes with the CDX seems to only have about 4 wires or so.

6) One more question - It's going to cost $105 for me to buy the CDX. Do you think this is a good price? Or should I consider an aftermarket unit? My primary interest was because this looked like a drop in. Seems a little less so now, but still within my wrenching skill level if we can muddle through that wiring.

Thanks again for guiding me through this. I really appreciate it. =D>

Keith

Re: How do I install a OEM 12 disc changer in my 02 SSEi?

Posted: Thu Apr 23, 2009 5:47 pm
by ddalder
If the part number stamped into the CDX bracket is 25719327 then it's for the Bonneville. The Aurora bracket has a shorter leg coming off the bottom than the Bonneville does.

I don't know that you need to worry about the plastic trim across the inside covering the rear tail lights. I installed the same CDX and bracket into my 2002 SE for which this was never offered as an option. I had no problem at all. I would leave this for the time being.

There are two connectors on the back of the Bonneville radio. One is for the antenna and the other is for everything else. Three of the terminals on the wide 32 pin Dock-N-Lock are for an auxiliary input. In your model year this input was for the CDX. In 2003-05 this input is shared between the CDX and S-Band receiver (XM radio module, also mounted in the trunk). I previously made a harness for a member allowing him to add both the CDX and XM to his 2003 model year. What you're looking for is the male connector mounted in the back of the radio bay that mates with the 32 pin connector.

This is what the back of the 2K+ Bonneville radio looks like. Several Pontiac radios have the same faceplate, but the Bonneville radio is the only car in the Pontiac line with the Dock-N-Lock connector.

Image

Here are some photos of the connector I'm talking about:

Image
Image
Image

It's the entire connector with 4 or 5 inches of wire that you require. The terminals you need slide into three of the vacant cavities (specifically A9, A10 & A11 as shown in one of the photos above).

Here is a picture of the terminals:

Image

This is a picture of the connector that plugs into the back of the CDX:

Image

This is a photo of the completed harness I made to install both the XM and CDX:

Image

You can't modify your existing trim to work. Unfortunately, in addition to having the cutout for the CDX it's got different curvatures to it. No getting around this one :sad:

$105 isn't a bad price for the OEM CDX since it comes with the bracket, changer and magazine. I'm a little concerned if it's missing wires though. This wouldn't make it impossible, but there would be more involved. It may just be how it looks in the photo you saw (or do you actually have it?). As for aftermarket, you can go that route but it won't be any easier to integrate with the factory radio. It will likely be more difficult. Most people that have done this replace the factory stereo altogether. I'm personally not a fan of this but that's just my preference.

Re: How do I install a OEM 12 disc changer in my 02 SSEi?

Posted: Fri Apr 24, 2009 12:31 am
by kts0347
Hi again,

Wow, it's all coming together, thanks. I really appreciate you taking the time to guide me through this.

1) The CDX is confirmed from a 2001 Pontiac, and has the same brackets as your picture. I should have a drop in fit.

2) I thought from your photo, that there was a bump out on the hard plastic trim panel, to accommodate the CDX rear bracket. Glad to hear that it was just a photo illusion, and that my stock trim panel will work.

3) The wiring harness included with the package has the connector to the CDX plus about 18 inches of wire (cut where it joined the main harness). So I should be all set for connectors in the trunk.

4) I would assume that my Receiver head unit must already have the harness connector plug installed, since the radio wouldn't work without it. So, do I just need to add the three connector copper terminations in A9, A10 and A16? Are they also already present and I just need to solder the wire to them, or are these slots empty and I need to get some new terminations, and add them to the connector?)

5) If I need to get three new copper terminations, could I just get a head unit harness connector plug from any 02-05 Bonneville, and then salvage any three copper terminations from it? i.e., it doesn't need to be from a CDX equipped car, since it looks like the terminations in all the connector slots are uniform, and should be interchangeable. So, just get "a connector with 5 inches of wire" as a donor, disassemble three of the copper terminators from the donor, create the harness, and plug these terminators into slots A9, 10 and 16 of my car's harness connector - right?

6) Since I am not adding an XM feature, do I just need to run a plain three wire conductor from the head unit to the DVX? Is there a recommended gauge? I see lots of other wires branching off your harness. I presume these have nothing to do with the CDX?

7) How do the A9, A10 and A16 connector points on the head unit relate to the DVX connector points? (right, left and common). I see there are only three wires on the head unit harness (red, white and black), but your photo of the DVX connector has purple and orange wires, plus multiples of the red, white and black wires. Are these extra wires because of the XM? Can you possibly make a similar schematic of the DVX connector, and show which slot in the head unit connects to which slot on the DVX?

8) Is the A side of the head unit connector the lower (closer to the floor) or upper side of the connector? In the picture the connector looks symetrical. Is the B side the one with the four blank slots?

9) I have asked the parts store to attempt to recover the soft trim from the donor car, since it is an 01 Bonneville and should fit my trunk.

I feel like I have an 80% handle on this install. The above questions are honing in on the remaining 20%. Thanks for the guidance. It would definitely not be possible without you. When this is done, you should cut and paste all your posts into one comprehensive post for the Tech Advice section. It's high quality and could be useful for others.

PS. I see you are from Alberta. I spent my childhood in Olds. Small world, 'eh? :beerchug:

Thanks.

Keith

Re: How do I install a OEM 12 disc changer in my 02 SSEi?

Posted: Fri Apr 24, 2009 1:19 am
by ddalder
Cool, Olds Eh? Are you still in Alberta?

Item #1:

In order to mount this, you will need a threaded stud that clips into the sheet metal of the trunk. If you look at the trunk picture in my previous post, it is where the nut in position 'A' is. IIRC, you'll also need 2 nuts (positions 'A' & 'B' in the photo). These are 10mm and have an attached washer. They should be the same as the ones used to hold the tail lights in place. Part numbers are:

Threaded stud: 25624179
Nut, 10mm: 11517293

Additionally, you'll also need a push-in retainer to hold the trim panel to the front of the CDX bracket (Position 'D' in the photo). These are available at virtually any auto part store.


Item #2:

There is a bit of a bump but I don't know how important it is. Like I mentioned, it was never a problem for my 2002 SE.

Item #4 & 5:

You will have the connector but there will NOT be terminals in positions A9, A10 or A11 (positions indicated in the photo by RED text). This is why you need the donor connector (it does not need to be a CDX equipped vehicle). The terminals in all positions are the same. What will differ is the colour of the wires and in some cases, the guage of the wire. For your purposes, it doesn't matter which wires you decide to use.

Item #6:

I use a 3 conductor audio cable - 22 AWG (0.35mm2) foil shielded w/ drain wire. The drain is only connected at the CDX end and is the bare wire. The signal is low level and therefore you don't need a larger guage. This is what GM has specified in their diagrams. Splice this onto the pigtail attached (I'll get specifics for you later) and splice it to three of the donor terminals with wires from your wrecker Dock-N-Lock connector. Cut the drain wire off flush where the wires exit the outer covering of the cable at the radio end.

I'll have to post specific connection information once I can get to my schematics.

Item #7:

The multiples of Red, White & Black are because the XM receiver module audio output is connected in parallel to the CDX audio output. In your case, you will only have one wire going to each of the terminals in these locations. In addition, there are two violet wires for the class 2 data bus, 1 black wire for ground and 1 orange wire for +12 VDC.

The reason you see so many wires coming off my harness is because I build them to plug into the factory splice packs (ground blocks) and the rear fuse block where these accessories would normally connect. This allows the use of fuses in the rear fuse block the way GM engineered. I'm very particular about keeping everything as OEM as possible with my modifications.

I can post connection points for these other wires along with the audio in a future message.

Item #8:

You will actually find several vacant cavities in your connector. If you are looking straight on, Side 'A' is the bottom (closest to the floor), Side 'B' is the top (closest to the roof). Pin 1 is closest to the passenger side of the car while Pin 16 is closest to the driver side.

Item #9:

The carpet trim from any 2000-05 Bonneville will fit. This is NOT true of the carpet from the LeSabre or Aurora which also use this same CDX.

Re: How do I install a OEM 12 disc changer in my 02 SSEi?

Posted: Fri Apr 24, 2009 2:21 am
by kts0347
Wow, I'm almost there. Just the schematics and the knowledge transfer should be complete. This has been a really interesting learning experience. I can't thank you enough.

I would like to learn about fusing the harness, as you suggest. So, details on how to build the harness is the last of the open issues. I assume I have to provide power supply as well as the signal carrier wires. In order for the CDX to be switched, I presume the power supply passes through the head unit?

Launched in Edmonton, raised in Olds, now in Florida. Go Oilers.

Thanks again,
Keith

Re: How do I install a OEM 12 disc changer in my 02 SSEi?

Posted: Sun Apr 26, 2009 12:54 am
by ddalder
Was about 2 grammatical corrections away from hitting submit. Got distracted and inadvertently hit 'BACK' instead. Lost the entire post :evil: :angry4: :evil: :angry4: :evil:

My apologies. I'm on the road all day tomorrow but will try and have the wiring instructions posted tomorrow night. This time I've started re-writing it in MS Word and making regular saves.

UGH!!!

Re: How do I install a OEM 12 disc changer in my 02 SSEi?

Posted: Sun Apr 26, 2009 2:06 pm
by kts0347
I really appreciate the help and suggest you put the whole thing into word and post it in the tech section. It's really good and others can benefit from it. I'm just thrilled to get such great help. =D>

Keith

Re: How do I install a OEM 12 disc changer in my 02 SSEi?

Posted: Sun Apr 26, 2009 11:40 pm
by ddalder
First, a little history about adding the CDX in vehicles not factory equipped with this option...

In the early production years of the 2K+ Bonneville GM offered an “Installation Kit” for the optional CDX. The kit included a wiring harness, bracket, additional mounting hardware for the bracket and the trim panel. This, along with the purchase of a CDX and magazine, and anyone who didn’t have the factory installed CDX was able to add it to their 2000-01 Bonneville. The only reason this kit didn’t work for 2002+ was because of the terminals crimped on to the audio cable. In 2000-01 the wires plug into a connector under the dash pad, not the DNL connector at the back of the radio. By modifying the cable to use DNL terminals and not GT 150 series terminals, this kit could be made to work for 2002 and newer. Unfortunately, this kit hasn’t been available now for at least a couple of years. A few of us checked and there is no left over stock at any dealership in Canada or the US.

Here are a few important abbreviations and general information items you’ll need to know to understand this article.

DNL – Dock-N-Lock
RCDLR – Remote Control Door Lock Receiver
TPA – Terminal Position Assurance (Lock)

BLK – Black
BLU – Blue
BRN – BRN
DK GRN – Dark Green
GRY – Gray
ORN – Orange
PPL – Purple
WHT – White

Wires will be either a solid colour alone, or a solid colour with a stripe. For example:

ORN – This indicates an Orange wire.
BLK/WHT – This indicates a black wire with a white stripe.

In most cases, Delphi connectors will have cavity references embossed into the plastic housing. A few connectors have every cavity identified while some connectors have only the end cavities identified. This still permits anyone looking to make determinations about what each cavity is.

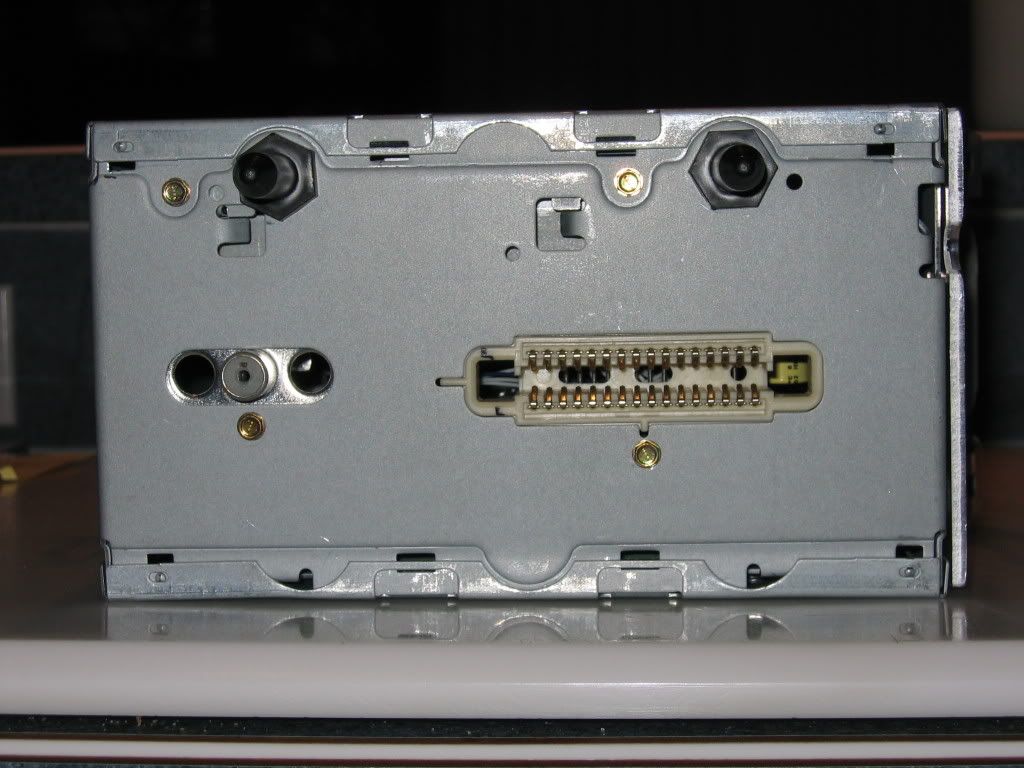
Here is information about the BLK 10 cavity CDX connector.

Pin:
1. - BRN/WHT (Left Audio Signal)
2. - DK GRN/WHT (Right Audio Signal)
3. - BLK/WHT (Audio Common) **
4. - BARE (Drain wire for shielding purposes)
GAP
5. - ORN (Battery Positive Voltage)
6. - Not Used
7. - BLK/WHT (Ground ) **
8. - Not Used
9. - PPL (Class 2 Serial Data)
10. - PPL (Class 2 Serial Data)

** There are two BLK/WHT wires. Care should be exercised to ensure you connect the correct one in each instance.


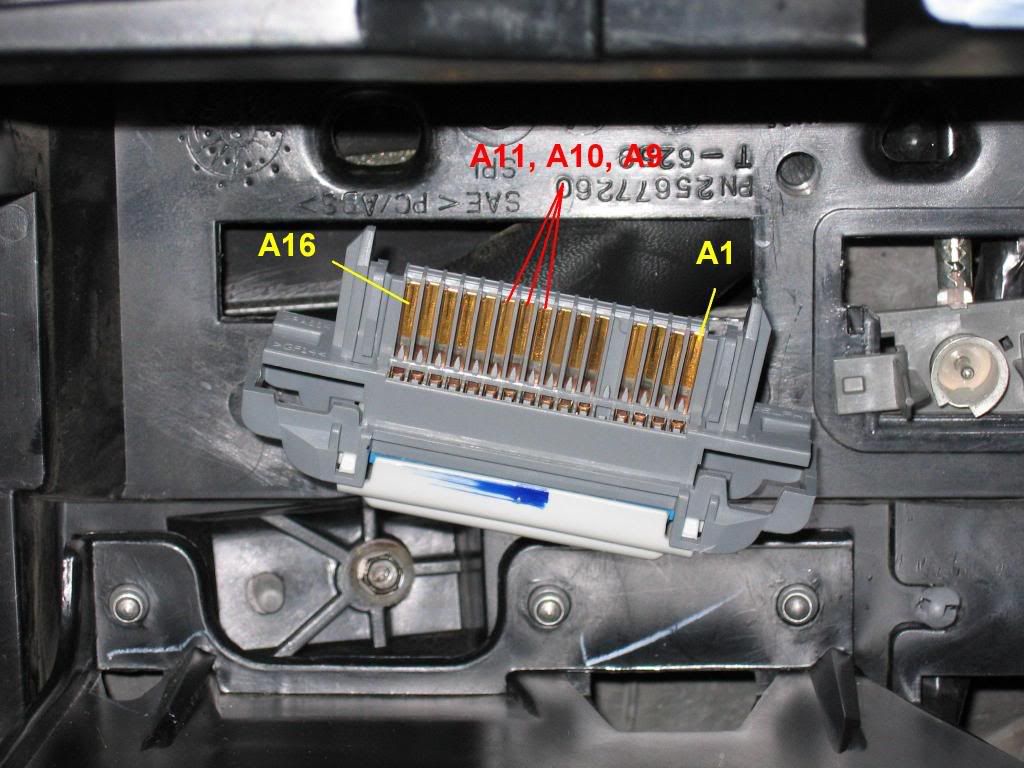
Here is information about the GRY 32 cavity DNL connector:

Pin:
A9 – BLK/WHT (Audio Common)
A10 – BRN/WHT (Left Audio Signal)
A11 – DK GRN/WHT (Right Audio Signal)


Here is information about the BLU 4 cavity RCDLR connector:

Pin:
1. - ORN (Battery Positive Voltage)
2. - PPL (Class 2 Serial Data)
3. - PPL (Class 2 Serial Data)
4. - BLK/WHT (Ground)


Now, on to the connections...

BEFORE YOU DO ANY WORK BELOW, DISCONNECT YOUR BATTERY! IT IS IMPORTANT THAT YOU USE PROPER TECHNIQUES FOR SPLICING INTO THE VEHICLE WIRING HARNESS. PART OF THIS INVOLVES MAKING CONNECTIONS INTO THE CLASS 2 SERIAL DATA BUS. FAILURE TO MAKE THESE CORRECTLY OR USING POOR TECHNIQUES MAY RESULT IN ERRONEOUS BEHAVIOUR WITH VIRTUALLY ANY FUNCTION IN YOUR VEHICLE. IT IS SOLELY THE RESPONSIBILITY OF THE VEHICLE OWNER, AND/OR THE INDIVIDUAL INSTALLING THIS OPTION TO ENSURE IT IS DONE CORRECTLY. NEITHER THE ARTICLE AUTHOR, NOR THE STAFF OR OWNER(S) OF THE PONTIAC BONNEVILLE CLUB FORUM SHALL BE RESPONSIBLE FOR ADVERSE EFFECTS DUE IN ANY PART TO FOLLOWING THE DIRECTIONS IN THIS ARTICLE. HAVING SAID THIS, EVERY EFFORT HAS BEEN MADE TO TRY AND ENSURE THE ACCURACY OF THE INFORMATION PROVIDED.

Using a 3 conductor, shielded audio cable (assuming colours are black, white and red) with a drain wire, make the following connections:

Step 1: Connect the BRN/WHT wire of the CDX pigtail to the WHT wire of the audio cable.

Step 2: Connect the DK GRN/WHT wire of the CDX pigtail to the RED wire of the audio cable.

Step 3: Connect the BLK/WHT wire of the CDX pigtail (Pin 3 on the CDX connector) to the BLK wire of the audio cable.

Step 4: Connect the BARE wire from the CDX Pigtail to the BARE wire of the audio cable.

Step 5: Splice the three donor terminals with wires onto the three conductors of your new audio cable. You likely won’t have matching colours so don’t worry too much about that. Just be sure you ultimately keep track of which wire is left, right and common audio.

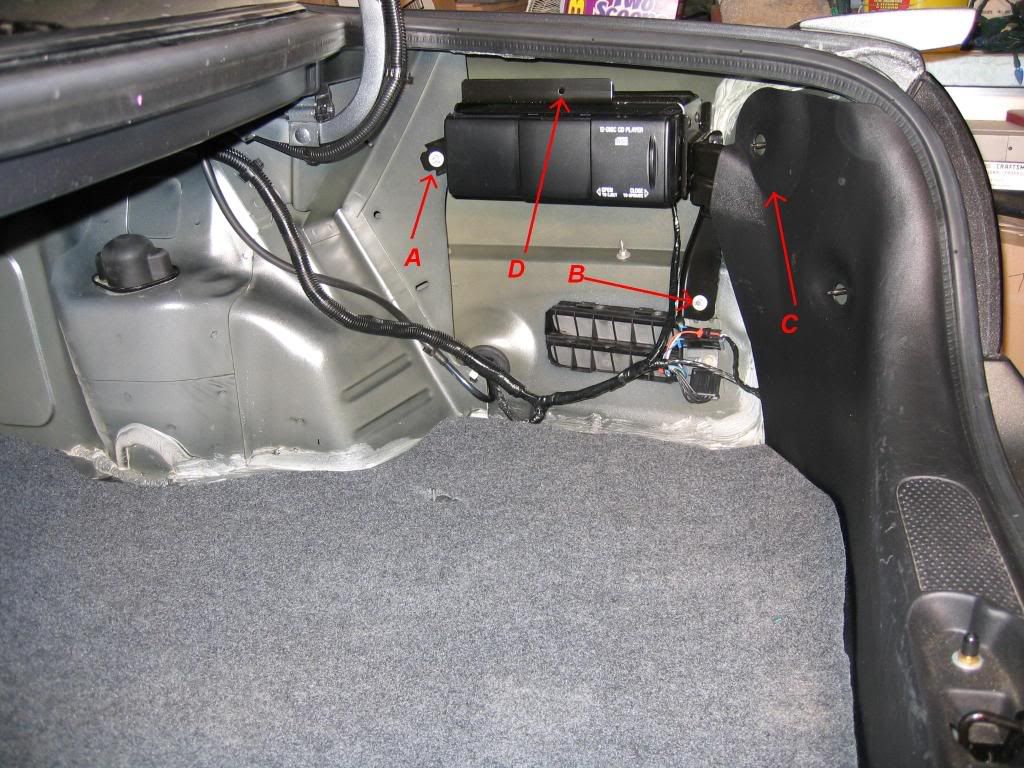
Step 6: Remove the trim around the instrument cluster, radio and climate control. You will need to remove two plastic rivets above the instrument cluster first. Look at this thread to see how these retainers work.

http://www.pontiacbonnevilleclub.com/fo ... 18&t=10884

Step 7: Remove the radio from the dash. Press each of the four spring clips toward the middle of the radio and pull towards you. There are no connectors on the back that need to be unplugged.

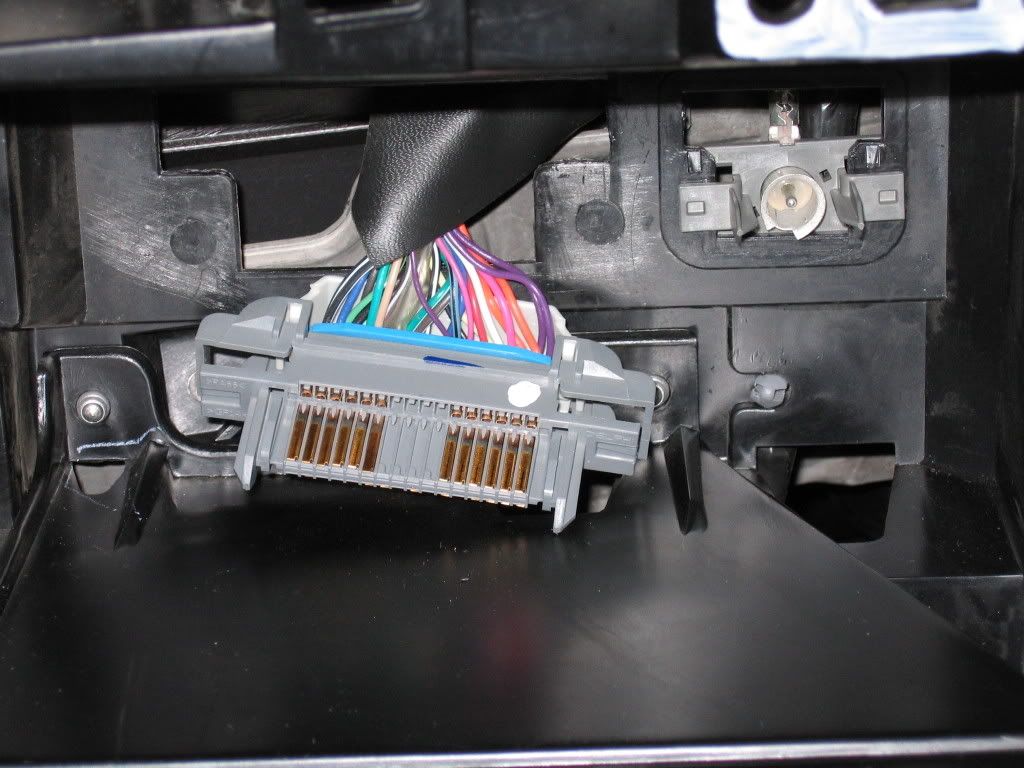
Step 8: Remove the DNL connector from the back of the radio bay. Slide it up and pull it towards you.

Step 9: Remove the plastic cover from the back of the DNL connector. It should either be WHT or GRY. You must also remove the TPA lock from the bottom (row ‘A’) of the connector. This will be BLU in colour. This must be done in order to install the new terminals.

Step 10: Route the audio cable from the CDX mounting location to the dash and through the back of the radio bay to allow for the wiring to be added to the connector.

Step 11: Insert the terminal spliced to the BLK audio cable wire into A9 of the DNL connector.

Step 12: Insert the terminal spliced to the WHT audio cable wire into A10 of the DNL connector.

Step 13: Insert the terminal spliced to the RED audio cable wire into A11 of the DNL connector.

Step 14: Reinstall the TPA lock.

Step 15: Reinstall the DNL connector to its original position in the back of the radio bay.

Step 16: Reinstall the radio. I would recommend testing everything before reinstalling the trim.

Connecting Power, Ground and Class 2 Serial Data Lines...

The way I’ll outline in this article is similar to the method GM used in the Installation Kit that used to be available. To do this you’ll need to splice into four wires of the vehicle.

First you need to locate the RCDLR. This is a small tan module clipped into the metal frame behind the rear seat accessible from the trunk. It will be located on the left side, near the 6x9 speaker mounted to the rear shelf. You will need to remove the black plastic trim panel that goes across the width of the trunk immediately behind the rear seat back. Once you have the trim removed, look for the module. It’s easily identified because it will have a single BLU connector plugged into it. The connector will have four wires; 1 ORN, 2 PPL and 1 BLK.

Step 17: Unplug the 4 cavity BLU connector from the RCDLR and remove 2-3 inches of the black harness wrap tape.

Step 18: Extend the ORN wire from the CDX pigtail, across the trunk and splice it to the ORN wire going into the BLU connector. This will be your Battery Positive supply. You do not need to add a fuse in this line. The CDX will be protected by the same circuit as the RCDLR. This is how GM accomplished this with their “Installation Kit”. In the factory installation (along with the harnesses that I build), there is a fuse specifically located in the rear fuse block for the CDX.

Step 19: Cut ONE of the PPL wires going into the BLU connector. Leave enough wire coming out of the connector that you can splice a wire onto it. You will now have two PPL wire ends near the BLU RCDLR connector.

Step 20: Extend the two PPL wires from the CDX pigtail to the BLU RCDLR connector. Splice each of these wires onto the two wires you have (from cutting the one PPL wire). It does not make any difference which of the two wires gets spliced to the wire going into the connector or the wire going into the vehicle wiring harness. In essence, you are simply adding the CDX in SERIES with the other Class 2 Data devices.

Finally, connecting the ground wire...

Step 21: There are a couple of ways you can make this final connection. You have the option to extend the final BLK/WHT wire from the CDX pigtail (make sure you have the correct one of the two) to the RCDLR connector. You can splice it to the BLK/WHT wire there.

The other possibility is to locate the ground splice pack. This is a small black “Module” that is bolted to the body, inside the trunk, just in front of the right rear tail light. You will note that it has several BLK or BLK/WHT wires connecting into the bottom. These are all ground wires and you can splice to any one of them.

Step 22: Plug the BLU connector back into the RCDLR module.

Step 23: Reconnect your battery.

Step 24: Load your CDX magazine. If it came loaded in the CDX, slide the door all the way towards the front of the car until you hear a distinct snap. You should see a white light illuminated at the bottom and front of the CDX opening. The magazine should eject on its own. Follow the directions in your Owner’s Manual on how to load the CD’s.

Step 25: Load the magazine into the CDX. Again, this is straight forward but instruction can be found in your Owner’s Manual if necessary. Close the CDX door all the way, again listen and feel for the snap as you slide the door rearward.

Step 26: Turn on your ignition to the ACC position. Turn on your radio. You should see a small CD STACK flashing on the display and hear noises from the CDX. This is the mechanism checking all the discs and determining how many tracks are on each. Once this process is complete, the CD STACK will illuminate solid on the radio display. Follow the instructions in the Owner’s Manual on how to use this CDX option.

Step 27: Once everything is verified as working, reinstall the dash trim along with all the trim in the trunk.

Step 28: ENJOY!!

Re: How do I install a OEM 12 disc changer in my 02 SSEi?

Posted: Mon Apr 27, 2009 1:17 am
by kts0347
:)

Re: How do I install a OEM 12 disc changer in my 02 SSEi?

Posted: Mon Apr 27, 2009 1:43 am
by kts0347
Wow, thanks. I feel confident I can handle this with all your detailed instructions. Thank you so much for investing yourself in this project. Now that it is so well documented, there will be several who want to make this modification. I did a search for used auto parts, and discovered there are a lot of yards that have the factory CDX player from a Bonneville. At least 10 when I checked last night. So, the parts are available.

I haven't found a correct trim panel, so I am going to try to use my stock panel. My plan is to cut out a rectangle the shape of the CDX that will just hide the brackets and wires. The CDX itself will "float" in the fender well. I'll see if the bracket where the trim is supposed to attach can be removed, so it looks a little more correct.

I've contacted all the yards that have a CDX available to see if they still have the donor car. Problem is they don't realize the trim panel is specific, and just send it to the crusher, along with the remains of the donor car. And, they move quick. So, by the time a CDX is listed for sale, the donor is probably crushed.

I just can't thank you enough. Without your step-by-step guidance, it would not have been possible to make this installation.

You're the best.

Keith =D> =D> =D> =D>

Re: How do I install a OEM 12 disc changer in my 02 SSEi?

Posted: Mon Apr 27, 2009 2:26 am
by ddalder
You're very welcome :wink: When I went to add this to my 2002 SE about six years ago I searched all over for assistance since the harness wouldn't connect directly to my car and all the instructions and connector references were for the 2000-01. There is enough difference between the years that it made for a challenge without proper reference material. There was a young gentleman working in the parts department for the GM dealership in Leduc (I was working there at the time). He went out of his way to pull diagrams for me and tried to help locate the connector terminals I needed even though I had previously bought the parts in Calgary. He was instrumental in helping me accomplish this. He was so helpful I thought it would be nice to buy him lunch some time. Sadly he was killed in a snowmobiling accident (avalanche) before I could do this. I've never forgotten the help he gave me and that's partly why I'm here.

Good luck with this! I'm sure you'll enjoy it. I use mine all the time :)

I'm also working on updating a post for my touch screen navigation. Keep your eyes open for that if you've ever been interested such an upgrade. It works with XM, steering wheel controls, OnStar and the CDX. You just won't see any CD or radio info on the HUD. Other HUD functions remain unchanged.

Re: How do I install a OEM 12 disc changer in my 02 SSEi?

Posted: Mon Apr 27, 2009 12:46 pm
by kts0347
Thanks again.

And, if anyone else is contemplating this addition, I just received the following offer for a nearly complete kit.

From: Bud (Strauss Automotive) [mailto:bud@straussautomotive.com]
Sent: Monday, April 27, 2009 10:39 AM
Subject: RE: Car-Part.com,2002,Pontiac Bonneville,Radio, D95871

12 DISC REMOTE CD CHANGER FROM 02 BONNEVILLE COMPLETE WITH BRACKETS,BOLTS AND TRIM PAD……$135.00 SHIPPED…..WE WILL NOT HAVE HARNESS THAT RUNS UP TO DASH

Re: How do I install a OEM 12 disc changer in my 02 SSEi?

Posted: Mon Apr 27, 2009 7:40 pm
by ddalder
That's not too bad at all. Hopefully he sends the threaded stud the clips into the sheet metal for the forward most fastener and not just the nut.

It doesn't surprise me about the harness. When GM installs these, the wiring is part of the entire main body harness and is definitely NOT easily separated. It could be done, but would be a lot of work. I suspect they'd charge you far more than it's worth to do.

Re: How do I install a OEM 12 disc changer in my 02 SSEi?

Posted: Tue Apr 28, 2009 11:20 pm
by kts0347
To keep you posted on progress.

I found a correct bracket CD player from an 01 Bonne, complete with the CDX connector pigtail.

I found a different yard that had a soft trim pad and the mounting bolts and studs.

Now, I am looking for the three copper terminals to add to my head unit connector, so I can build the wiring harness. The yards don't want to cut off the head unit connector from the front harness. If anyone can help with these terminals it would be very appreciated.

Thanks for all the input and help.

:beerchug:

Re: How do I install a OEM 12 disc changer in my 02 SSEi?

Posted: Tue Apr 28, 2009 11:29 pm
by 00SLE
So what kind of signal goes to and from the RCDLR? Is it a signal that tells the radio, 'hey there's something plugged into these terminals' so that it recognizes the cdx as being hooked into the system? Is it just an electrical pulse so it knows 'something' is there, or is there an actual 1's and 0's signal being sent that says this is a cdx so the radio knows how to control it?

Re: How do I install a OEM 12 disc changer in my 02 SSEi?

Posted: Tue Apr 28, 2009 11:31 pm
by ddalder
Frankly, most wreckers irritate me to near insanity.

I tried to purchase the small metal bracket under the driver knee bolster. I drove an hour to the wrecker because someone there told me they'd sell it. When I got there, they refused. They had three 2000+ Bonnevilles in the yard and would only sell it with the entire dash. Realistically, if there was enough damage to need to replace the entire instument panel the car would be written off. Did they honestly think they were going to sell three complete instument panels?

I've called a variety of wreckers for a multitude of different parts. Most are horrible to deal with. I've run across some that were great and I've started composing a list of those so I can give them repeat business.

I do wish you luck though. I feel your frustration.