Series I L27 (1992-1994 SE,SLE, SSE) & Series II L36 (1995-1999 SE, SSE, SLE) and common problems for the Series I and II L67 (all supercharged models 92-99) Including Olds 88's, Olds LSS's, Olds 98 91-96, Buick Lesabres and Park Avenue 91-96. Please use General Chat for non-mechanical issues, and Performance and Brainstorming for improvements.
I will be overhauling a 4T65e-HD transmission in the near future and wanted to post some pics for you guys. Hope you like it.
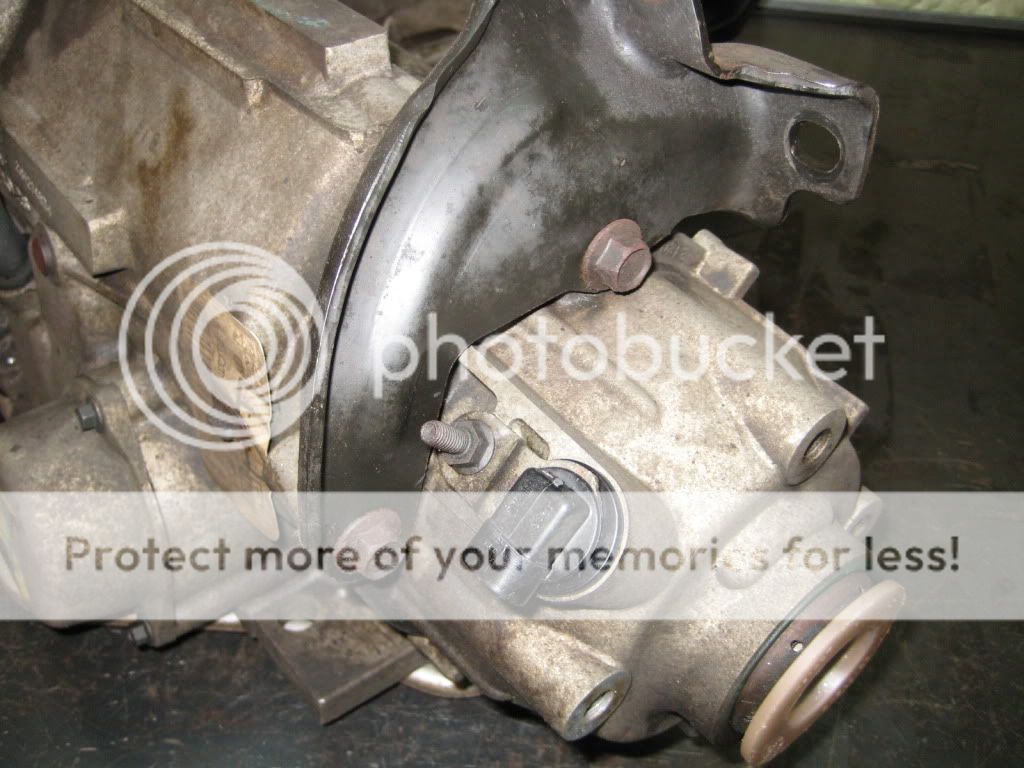
After a bath from my pressure washer. Note the plugs at the axle shaft output and vent. All openings should be capped, plugged or sealed in some manner to keep water out when pressure washing. The torque converter was installed when pressure washing to keep water out. There will come a time that the case can be pressure washed inside and out, but that is at a much later stage in the process.
Imagine that, a broken front mount!
Last edited by 1fatcat on Wed Jun 09, 2010 11:40 pm, edited 4 times in total.
Drain the torque converter. This will take a few hours to drain, overnight is best.
A trans overhaul will make a mess! Have a clean work area with lots of room to store all the parts that come out of it. A fluid containment work bench works best, but not many folks have one.
Remove brackets, sensors and fill tube.
Mark the stud bolts
Clean the crud out of the torx bolts
Remove the side case
Sometimes the torx bolts round and you need to chisel them loose.
Remove wirring harness
Remove pump cover, or assembly if preferred, it will be gone through later.
Remove pump assembly
This is the channel plate after the valve body is removed
Note the location of the check balls
Remove the pump drive
This is after the channel plate is removed
Make sure to keep track of locator pins, they are very important and can not be left out.
Last edited by 1fatcat on Wed Jun 09, 2010 11:43 pm, edited 1 time in total.
Up to this point, have you used any special tools or pullers?
Good pictures.
Does everything come out together with the pump cover? I see plungers and solenoids.
2000 SSEi - SilverBullet - 78,000 kms, 4" "straight shot" custom headlight ram air inlet, TOGs, 1.9's, Lsd, 2.9-3.4"MPS 10-15 psi, Ported GenV, EGR eliminated, OR pushrods, oil volume kit, trani cooler & shift kit, Titanium retainers, 90 lb springs, 160 Stat, 42# injectors, Fuel pump voltage increase, Wideband O2, 3" to dual 2 1/2" Magnaflows, Snow Meth/water injection, after SC temp gauge, 255/50WR17, timing commander set 15-18*@WOT, 2 speed Fan over-ride, disabled DRL, Solid motor mount, Meziere Electric water pump, adjustable fuel pressure regulator, Drilled & slotted rotors/ceramics, GXP sway bars and STB, Upgraded and rebuilt transmission with ZZP 2500 rpm stall TC, Pioneer Bluetooth stereo with sub and 800 W amps, PB 13.5 quarter, (April 2014 car of the month)
To this point, there have been no special tools. Unless you consider torx or chisels "special". The pump cover does not hold everything. It comes apart in 3 main layers, the pump, then the valve body, then the channel plate.
Remove the chain, sprockets and related parts
The torque converter lock up o-ring must be removed prior to input shaft removal
After chain and sprocket removal
Remove oil baffles
Pan removal
Remove the filter
Remove the spring from the anti bleed valve
Remove the clip from the lube tube
After apply piston and accumulator pack removal
Spotted the first big problem, a broken land on a band
Remove the apply piston cover
You may need to tap the c-clip to spin it a little
Push down on the cover to get more access to the clip
Removing the guts
Still no special tools to this point.
A nice stack of parts, all of which need to be broken down further, inspected and repaired/replaced as needed
A burned up band
And the drum it rides on
Here is that broken band land. This is not the band that burned
Behind door number 2...
This doesn't look stock to me, I assume it was the cause of or attempted solution to the broken band land
A shot of the differential
Remove this roll pin and plug to replace the o-ring seal inside
Another shot of "the pile"
Remove the remaining seals
Use a long, sharp chisel to collaps the seal in on itself. Be careful of the soft aluminum case
A seal puller for the converter seal (the first special tool used (and it's still not that special)
Remove the converter hub if you want, generally you will not need to
Keep going cowboy. I'm liking what I see so far. I know how hard it is to stop and take pictures as you work without getting caught up in the moment and skip tricky moves.
2000 SSEi - SilverBullet - 78,000 kms, 4" "straight shot" custom headlight ram air inlet, TOGs, 1.9's, Lsd, 2.9-3.4"MPS 10-15 psi, Ported GenV, EGR eliminated, OR pushrods, oil volume kit, trani cooler & shift kit, Titanium retainers, 90 lb springs, 160 Stat, 42# injectors, Fuel pump voltage increase, Wideband O2, 3" to dual 2 1/2" Magnaflows, Snow Meth/water injection, after SC temp gauge, 255/50WR17, timing commander set 15-18*@WOT, 2 speed Fan over-ride, disabled DRL, Solid motor mount, Meziere Electric water pump, adjustable fuel pressure regulator, Drilled & slotted rotors/ceramics, GXP sway bars and STB, Upgraded and rebuilt transmission with ZZP 2500 rpm stall TC, Pioneer Bluetooth stereo with sub and 800 W amps, PB 13.5 quarter, (April 2014 car of the month)
Very Good thread!! Still not something I would want to tackle unless a pro was standing right there, but cool to see that someone can do it, lol.
Bye Bye: RIP sandrock
Sirius wrote:Think about it. You’re tooling down the road in your Prius, knowing full-well that this thing being green is as big a sham as federally mandated ethanol-enriched gas, Russia pulling out of Ukraine, and Obamacare.
First, I hope it goes to the second page because I run IE8 in protected modes and it has to download the pics each time I go to the post.
Second, I hope to be getting involved with the post.