

Am putting on new front brake rotors (old ones are warped) for my wife's '94 Bonneville. Bolts appear to be Allen or Torx, but are a bit rusty and are needing plenty of wd-40 to see what's needed.
What do I need (and size) to to get them out?
Thanks! Slug
How to remove calipers on '94 Bonneville?
-
J Wikoff
- Administrator

- Posts: 17080
- Joined: Mon May 19, 2008 7:01 pm
- Year and Trim: 1992 SSE
2009 G8 GT - Location: Central Illinois
- Contact:
Re: How to remove calipers on '94 Bonneville?
3/8" allen head if I remember right.
WHITE WHINE - 1992 SSE Supercharged 236.26 ci (.040 Over) 15.090 at 90.2 MPH on old engine w/ slipping trans & melted O2 sensor - Gen 3 M62 and matching TB, Gen 2 Pully, Zillamotorsports Ported LIM, YT 1.72 Roller Rockers, SII FPR & Injectors, Hypertech Thermomaster chip w/ 160 Thermo, TransGo Shift Kit, Infinity/Pioneer Speakers & a 10" Alpine Type R Sub, all the watts, 140 amp Alternator, Ricepipe CAI w/ heatshield, Pilot Angel Eye Foglights, Clear Corners, '02 17" Chrome Bent 5's, Magnaflow F-Body Muffler and Hi-flo Cat, Ceramic Coated Ported Exhaust Manifolds, Fan Override, Monroe Reflex struts, red calipers
2009 G8 GT - Sport Red Metallic, loaded, SOLO Axlebacks, Rotofab Intake, Tuned, autodim mirror, removed intake manifold cover, HSV GTS triple gauge pod, two tone red-hot shifter and HSV SuperSport steering wheel, GXP rear sway bar and diffuser, 3.45 diff and various Camaro suspension bits, LED Taillights
-
wjcollier07
- Certified Bonneville Nut

- Posts: 5647
- Joined: Thu May 22, 2008 7:08 pm
- Year and Trim: ____
Re: How to remove calipers on '94 Bonneville?
Technically, a 3/8" hex. That's all. Don't forget to lube the caliper pins! And also don't forget not to let the caliper hang off the brake hose. 
Good luck!
Good luck!
John
Now: '15 Toyota Prius III | 134 hp 2ZR-FXE | Silver | 36k
Now: '03 Honda CR-V AWD | Slow 4-Cylinder | Dirt | 180k
Then: '07 Ford Fusion SEL | 221hp Gen I VVT Duratec 3.0 V6 | Tungsten Silver | 150k
Then: '99 Toyota Avalon XL | 200hp 1MZ-FE 3.0 V6 | Diamond White | 189k | Sold: July 2015
Then: '11 Ford Fusion SEL | 240hp Gen II VVT Duratec 3.0 V6 | Ingot Silver | 84k | Totaled: Oct 23 '14 (Rear-Ended)
Then: '96 Buick Park Avenue Ultra | 240hp Series II L67 | Medium Dark Lichen | Bought: JAN 11 @ 135k | Accident: FEB 3 '12 | Crushed: MAR 1 '13 @ 153K
Then: '98 Pontiac Bonneville SSE | 205hp Series II 3800 L36 | Topaz Firemist | Bought: NOV '09 @ 74k | Accident: MAY 28 '10 | Crushed: MAR 15 '11 @ 84k
Then: '93 Pontiac Bonneville SE | 170hp Series I 3800 L27 | Dark Yellow Green | Bought: JULY '07 @ 92k | Sold: JULY '12 @ 118k
Then: '89 Pontiac Bonneville LE | 165hp 3800 LN3 | Medium Garnet Red | Bought: JAN '05 @ 117k | Sold: SEP 30 '07 @ 152k
-
bill buttermore
- Retired Gearhead

- Posts: 3989
- Joined: Mon May 19, 2008 12:35 pm
- Year and Trim: 98 Caravan is the daily driver 215K
- Location: Ames, Iowa
Re: How to remove calipers on '94 Bonneville?
If you don't have a socket style hex that fits, and are reduced to using a simple hex key, you may need to multiply the torque by slipping a large box wrench or a piece of pipe over the arm of the key to break the bolts loose. Sometimes it takes a lot of force to break them loose, so make sure you have cleaned out the hex bolt so that the tool can fully seat. It may also help to turn out the knuckle with the steering wheel so it is easier to apply the force perpendicular to the bolt.
Last edited by bill buttermore on Mon Nov 16, 2009 7:54 pm, edited 1 time in total.
1998 3.8 Dodge Caravan 214K
2000 3.3 Dodge Caravan 175K
1949 Plymouth Special Deluxe 4-dr sedan 25K (needs some work!)
-
slug
- GXP Member

- Posts: 222
- Joined: Sun Jun 01, 2008 1:25 am
- Year and Trim: 1994 SLE
1998 SE - Location: Twin Lake, MI
Re: How to remove calipers on '94 Bonneville?
Ok, thanks for all the tips guys!
Seems like our '98 just had hex bolts through the calipers when I did it last.
I thought we had a TechInfo article on this, but maybe I'm just thinking of a detailed post that I couldn't find.
Ok, so off to the parts store to see what I can find .
.
Seems like our '98 just had hex bolts through the calipers when I did it last.
I thought we had a TechInfo article on this, but maybe I'm just thinking of a detailed post that I couldn't find.
Ok, so off to the parts store to see what I can find
-
slug
- GXP Member
- Posts: 222
- Joined: Sun Jun 01, 2008 1:25 am
- Year and Trim: 1994 SLE
1998 SE - Location: Twin Lake, MI
Re: How to remove calipers on '94 Bonneville?
I popped for the socket style 3/8 inch Allen head as Bill Buttermore favors (see his discussion in this thread). I really don't think a standard type Allen wrench, even with a pipe extender helper, could have done the job on one of the bolts. Thanks again, Bill, for your experienced advice!
We love our old Bonnevilles, but they are getting old. Buy the best tools you can afford for them, if you want to keep them going forever (and they will go forever--believe it!).
I'll update tomorrow on how I come out on this project. The rotor warp seems to bother my wife and daughter, much more than me. But they're the ones who have to drive it.
Maybe we should consider a TechInfo article for disc brakes. There's already enough info in this thread to make it worthwhile. As before, I'm willing to "guinea pig" the work and take pics, if someone wants to put it together and submit. No doubt there's already a post or three on this.
slug
-
00Beast
- Retired Site Developer
- Posts: 20960
- Joined: Tue May 27, 2008 10:30 pm
- Year and Trim: '17 Silverado 1500
- Location: MN/IA
- Contact:
Re: How to remove calipers on '94 Bonneville?
IIRC Archon was making one for the 2000+.
Bye Bye:

RIP sandrock
RIP sandrock
Sirius wrote:Think about it. You’re tooling down the road in your Prius, knowing full-well that this thing being green is as big a sham as federally mandated ethanol-enriched gas, Russia pulling out of Ukraine, and Obamacare.
-
J Wikoff
- Administrator
- Posts: 17080
- Joined: Mon May 19, 2008 7:01 pm
- Year and Trim: 1992 SSE
2009 G8 GT - Location: Central Illinois
- Contact:
Re: How to remove calipers on '94 Bonneville?
slug wrote:I popped for the socket style 3/8 inch Allen head as Bill Buttermore favors (see his discussion in this thread). I really don't think a standard type Allen wrench, even with a pipe extender helper, could have done the job on one of the bolts. Thanks again, Bill, for your experienced advice!
We love our old Bonnevilles, but they are getting old. Buy the best tools you can afford for them, if you want to keep them going forever (and they will go forever--believe it!).
I'll update tomorrow on how I come out on this project. The rotor warp seems to bother my wife and daughter, much more than me. But they're the ones who have to drive it.
Maybe we should consider a TechInfo article for disc brakes. There's already enough info in this thread to make it worthwhile. As before, I'm willing to "guinea pig" the work and take pics, if someone wants to put it together and submit. No doubt there's already a post or three on this.
slug
If you could take a pic of each general step, I'm sure someone could fill in the blanks. That could be helpful.
WHITE WHINE - 1992 SSE Supercharged 236.26 ci (.040 Over) 15.090 at 90.2 MPH on old engine w/ slipping trans & melted O2 sensor - Gen 3 M62 and matching TB, Gen 2 Pully, Zillamotorsports Ported LIM, YT 1.72 Roller Rockers, SII FPR & Injectors, Hypertech Thermomaster chip w/ 160 Thermo, TransGo Shift Kit, Infinity/Pioneer Speakers & a 10" Alpine Type R Sub, all the watts, 140 amp Alternator, Ricepipe CAI w/ heatshield, Pilot Angel Eye Foglights, Clear Corners, '02 17" Chrome Bent 5's, Magnaflow F-Body Muffler and Hi-flo Cat, Ceramic Coated Ported Exhaust Manifolds, Fan Override, Monroe Reflex struts, red calipers
2009 G8 GT - Sport Red Metallic, loaded, SOLO Axlebacks, Rotofab Intake, Tuned, autodim mirror, removed intake manifold cover, HSV GTS triple gauge pod, two tone red-hot shifter and HSV SuperSport steering wheel, GXP rear sway bar and diffuser, 3.45 diff and various Camaro suspension bits, LED Taillights
-
Archon

- Resident Gearhead

- Posts: 8781
- Joined: Mon May 19, 2008 10:30 pm
- Year and Trim: 2014 Cadillac XTS Vsport.
- Location: Grand Rapids, Michigan
Re: How to remove calipers on '94 Bonneville?
This is for the 2000+s, but is basically the same. The only real difference is the caliper pins.
Front Brakes
Raise, and properly support the vehicle.
Remove the wheels.
Using a large C-clamp, compress the pads enough to relieve the pressure of the pads against the rotor.

Remove the two caliper bolts.

Using a screw driver, pry between the caliper bracket and the caliper until it slides off. Support the caliper so that it does not hang from the flex brake hose.

Remove the caliper bracket, and the pads from the bracket.

(If just replacing pads, the bracket and rotor do not need to be removed so those steps can be skipped.)
Clean the mating surface on the caliper bracket, and the steering knuckle where it bolts on. If the new pads did not come with new caliper clips, clean any dirt and grease off them.
If the rotors are original, they may be held on by some clips. These can be cut off, or spun off using some needle nosed pliers. Whether you decide to install them, is up to you.
Remove the rotor. If it is rusted on, spray some penetrating oil around the middle of rotor, then strike the rotor between the studs, with a hammer until the rotor comes off. Use care not to hit the studs, or you’ll damage the threads.
Clean any loose rust from the surface of the hub, with a wire brush.

Put the new rotor back on the hub, lightly grease the caliper clips, then bolt the caliper bracket on to the steering knuckle. Tighten to 137 ft. lbs. (GM recommends using blue thread lock on the bracket bolts.)

Install the brake pads.

Take one of the old pads, and place it on the caliper next to the piston. Using the C-clamp, compress the piston in. Some suggest loosening the bleeder screw while doing this to keep any dirt and old fluid being pushed back into the master cylinder.

Clean the caliper slide pins, and lube with high temperature brake grease.
Install the caliper over the pads. While installing the caliper, push the boots in that are attached to the caliper bracket so that the holes in the boots line up with the holes in the caliper. Install the slide pins, and torque to 63 ft. lbs.
This would also be a good time to bleed the brakes, and flush out the old fluid.
Front Brakes
Raise, and properly support the vehicle.
Remove the wheels.
Using a large C-clamp, compress the pads enough to relieve the pressure of the pads against the rotor.
Remove the two caliper bolts.
Using a screw driver, pry between the caliper bracket and the caliper until it slides off. Support the caliper so that it does not hang from the flex brake hose.
Remove the caliper bracket, and the pads from the bracket.
(If just replacing pads, the bracket and rotor do not need to be removed so those steps can be skipped.)
Clean the mating surface on the caliper bracket, and the steering knuckle where it bolts on. If the new pads did not come with new caliper clips, clean any dirt and grease off them.
If the rotors are original, they may be held on by some clips. These can be cut off, or spun off using some needle nosed pliers. Whether you decide to install them, is up to you.
Remove the rotor. If it is rusted on, spray some penetrating oil around the middle of rotor, then strike the rotor between the studs, with a hammer until the rotor comes off. Use care not to hit the studs, or you’ll damage the threads.
Clean any loose rust from the surface of the hub, with a wire brush.
Put the new rotor back on the hub, lightly grease the caliper clips, then bolt the caliper bracket on to the steering knuckle. Tighten to 137 ft. lbs. (GM recommends using blue thread lock on the bracket bolts.)
Install the brake pads.
Take one of the old pads, and place it on the caliper next to the piston. Using the C-clamp, compress the piston in. Some suggest loosening the bleeder screw while doing this to keep any dirt and old fluid being pushed back into the master cylinder.
Clean the caliper slide pins, and lube with high temperature brake grease.
Install the caliper over the pads. While installing the caliper, push the boots in that are attached to the caliper bracket so that the holes in the boots line up with the holes in the caliper. Install the slide pins, and torque to 63 ft. lbs.
This would also be a good time to bleed the brakes, and flush out the old fluid.
*Gone, but not forgotten* - Black 2000 SSEi, HIR Headlights, Angel Eyes fogs, 3rd brake light overlay, hi-flo cat, 180 degree thermostat, HS 1.9 rockers, LSx yellow springs, Intense FWI, PCM, shift kit, push rods, and 3.4 Pulley. ZZP Power Log.
-
slug
- GXP Member
- Posts: 222
- Joined: Sun Jun 01, 2008 1:25 am
- Year and Trim: 1994 SLE
1998 SE - Location: Twin Lake, MI
Re: How to remove calipers on '94 Bonneville?
Nice pics and post Dick! I figured either you or Bill B probably had it in mind. (I'll send you pics and verbage related to the '94 style of front brakes if you like sometime. Let me know the sizing and kb you like for pics).
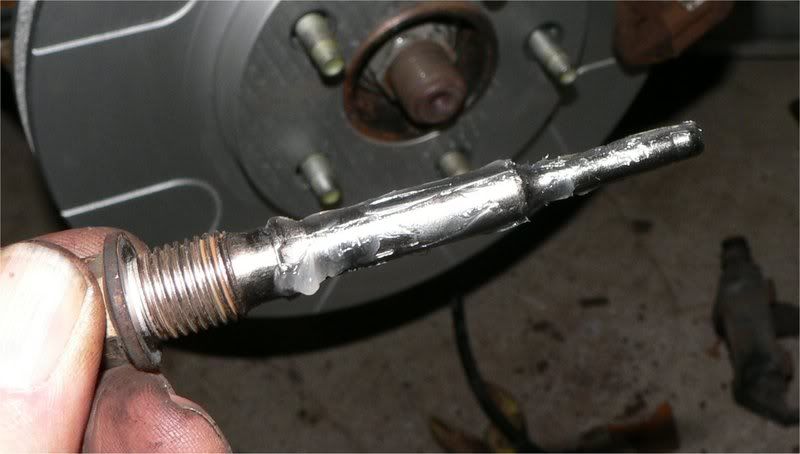
I finished this project about 1:30 AM this morning. The '94 style of pin bolts makes this job a lot harder than the '98 style (see Bill B's discussion in this thread). When the "tucked-in" style of Allen bolt gets corroded, it sort of haunts you all the way through the job. So I had to do a little grinding and a little "massaging" and a little WD-40ing and a little greasing here and there on the pins and sleeves. You just can't get the bolts started into the caliper threads otherwise.
The pin bolts look a little "beat-up" on the slide part. I didn't think to look inside the sleeves or check tolerance. I greased them (but didn't see Archon's post in time about which grease to use) and put them back in.
Should I replace the pins and sleeves? The '94 has about 140k miles on it.
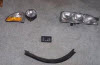
I test-rided the car after the right side fix. Already the "throbbing" was cured. Later this morning I noticed some damage to the right hand rotor: (see bottom part of rotor -- it actually looks worse than the picture. Haven't checked the pad yet. The rotor itself is obviously quite corroded. I didn't even consider it for milling down.)

Naturally, I replaced the left rotor as well.
I didn't do the front brake job myself the last time (about three years ago). It was up on the hoist for new struts and I asked the shop owner to check brakes. He advised new front pads (which I had him do), but he said the rotors were ok at that time. But that's about when I started to feel the "throbbing". And that's also when I started to get "memory steer" due to dry top strut bearings (which took a while to figure out--many thanks to the Pontiac Bonneville Club for help on this!).
My shop owner always makes good on stuff (even out of warranty), but I kind of have to pay attention to what his wrench-guys have done (I'm staying with him on stuff I don't want to do myself because he's personally competent himself, very honest, and has a good heart. Sometimes, though, he just tries a little too hard to save his customers money. Well, I can't fault that very hard!).
(BTW -- I like NAPA standard rotors really well and also their upscale semi-ceramic pads. This combo is used by NAPA employees and works very well for non-spirited to semi-spirited drivers. You "hot-rodders" are on your own!)
I finished this project about 1:30 AM this morning. The '94 style of pin bolts makes this job a lot harder than the '98 style (see Bill B's discussion in this thread). When the "tucked-in" style of Allen bolt gets corroded, it sort of haunts you all the way through the job. So I had to do a little grinding and a little "massaging" and a little WD-40ing and a little greasing here and there on the pins and sleeves. You just can't get the bolts started into the caliper threads otherwise.
The pin bolts look a little "beat-up" on the slide part. I didn't think to look inside the sleeves or check tolerance. I greased them (but didn't see Archon's post in time about which grease to use) and put them back in.
Should I replace the pins and sleeves? The '94 has about 140k miles on it.
I test-rided the car after the right side fix. Already the "throbbing" was cured. Later this morning I noticed some damage to the right hand rotor: (see bottom part of rotor -- it actually looks worse than the picture. Haven't checked the pad yet. The rotor itself is obviously quite corroded. I didn't even consider it for milling down.)
Naturally, I replaced the left rotor as well.
I didn't do the front brake job myself the last time (about three years ago). It was up on the hoist for new struts and I asked the shop owner to check brakes. He advised new front pads (which I had him do), but he said the rotors were ok at that time. But that's about when I started to feel the "throbbing". And that's also when I started to get "memory steer" due to dry top strut bearings (which took a while to figure out--many thanks to the Pontiac Bonneville Club for help on this!).
My shop owner always makes good on stuff (even out of warranty), but I kind of have to pay attention to what his wrench-guys have done (I'm staying with him on stuff I don't want to do myself because he's personally competent himself, very honest, and has a good heart. Sometimes, though, he just tries a little too hard to save his customers money. Well, I can't fault that very hard!).
(BTW -- I like NAPA standard rotors really well and also their upscale semi-ceramic pads. This combo is used by NAPA employees and works very well for non-spirited to semi-spirited drivers. You "hot-rodders" are on your own!)
-
Archon
- Resident Gearhead
- Posts: 8781
- Joined: Mon May 19, 2008 10:30 pm
- Year and Trim: 2014 Cadillac XTS Vsport.
- Location: Grand Rapids, Michigan
Re: How to remove calipers on '94 Bonneville?
Thanks, and yeah...go ahead and send me what you have. I'll send you more info via PM.
I remember the pins from doing work on a '93 SSE. If things aren't too rusty, or dirty, they aren't too bad to get out. If they are - you're in for a tough go of it.
If the pins show damage, often some gouges or slits cut across them, they should be replaced.
I remember the pins from doing work on a '93 SSE. If things aren't too rusty, or dirty, they aren't too bad to get out. If they are - you're in for a tough go of it.
If the pins show damage, often some gouges or slits cut across them, they should be replaced.
*Gone, but not forgotten* - Black 2000 SSEi, HIR Headlights, Angel Eyes fogs, 3rd brake light overlay, hi-flo cat, 180 degree thermostat, HS 1.9 rockers, LSx yellow springs, Intense FWI, PCM, shift kit, push rods, and 3.4 Pulley. ZZP Power Log.